Programmatic SEO sounds like a very technical term, but you can implement the technique on WordPress sites as well, and that too without knowing how to code or having deep technical knowledge.
In fact, there are several ways to do programmatic SEO in WordPress, and I will be going through most of them in this post.
Let’s get to it, then…
Different ways to do programmatic SEO in WordPress
If you’re doing pSEO in WordPress, you can choose one of the following ways, depending on your requirements:
- By using WP All Import plugin
- By using Multi-Page Generator plugin
- By using other 3rd party tools
Now, let’s go through each of them in detail.
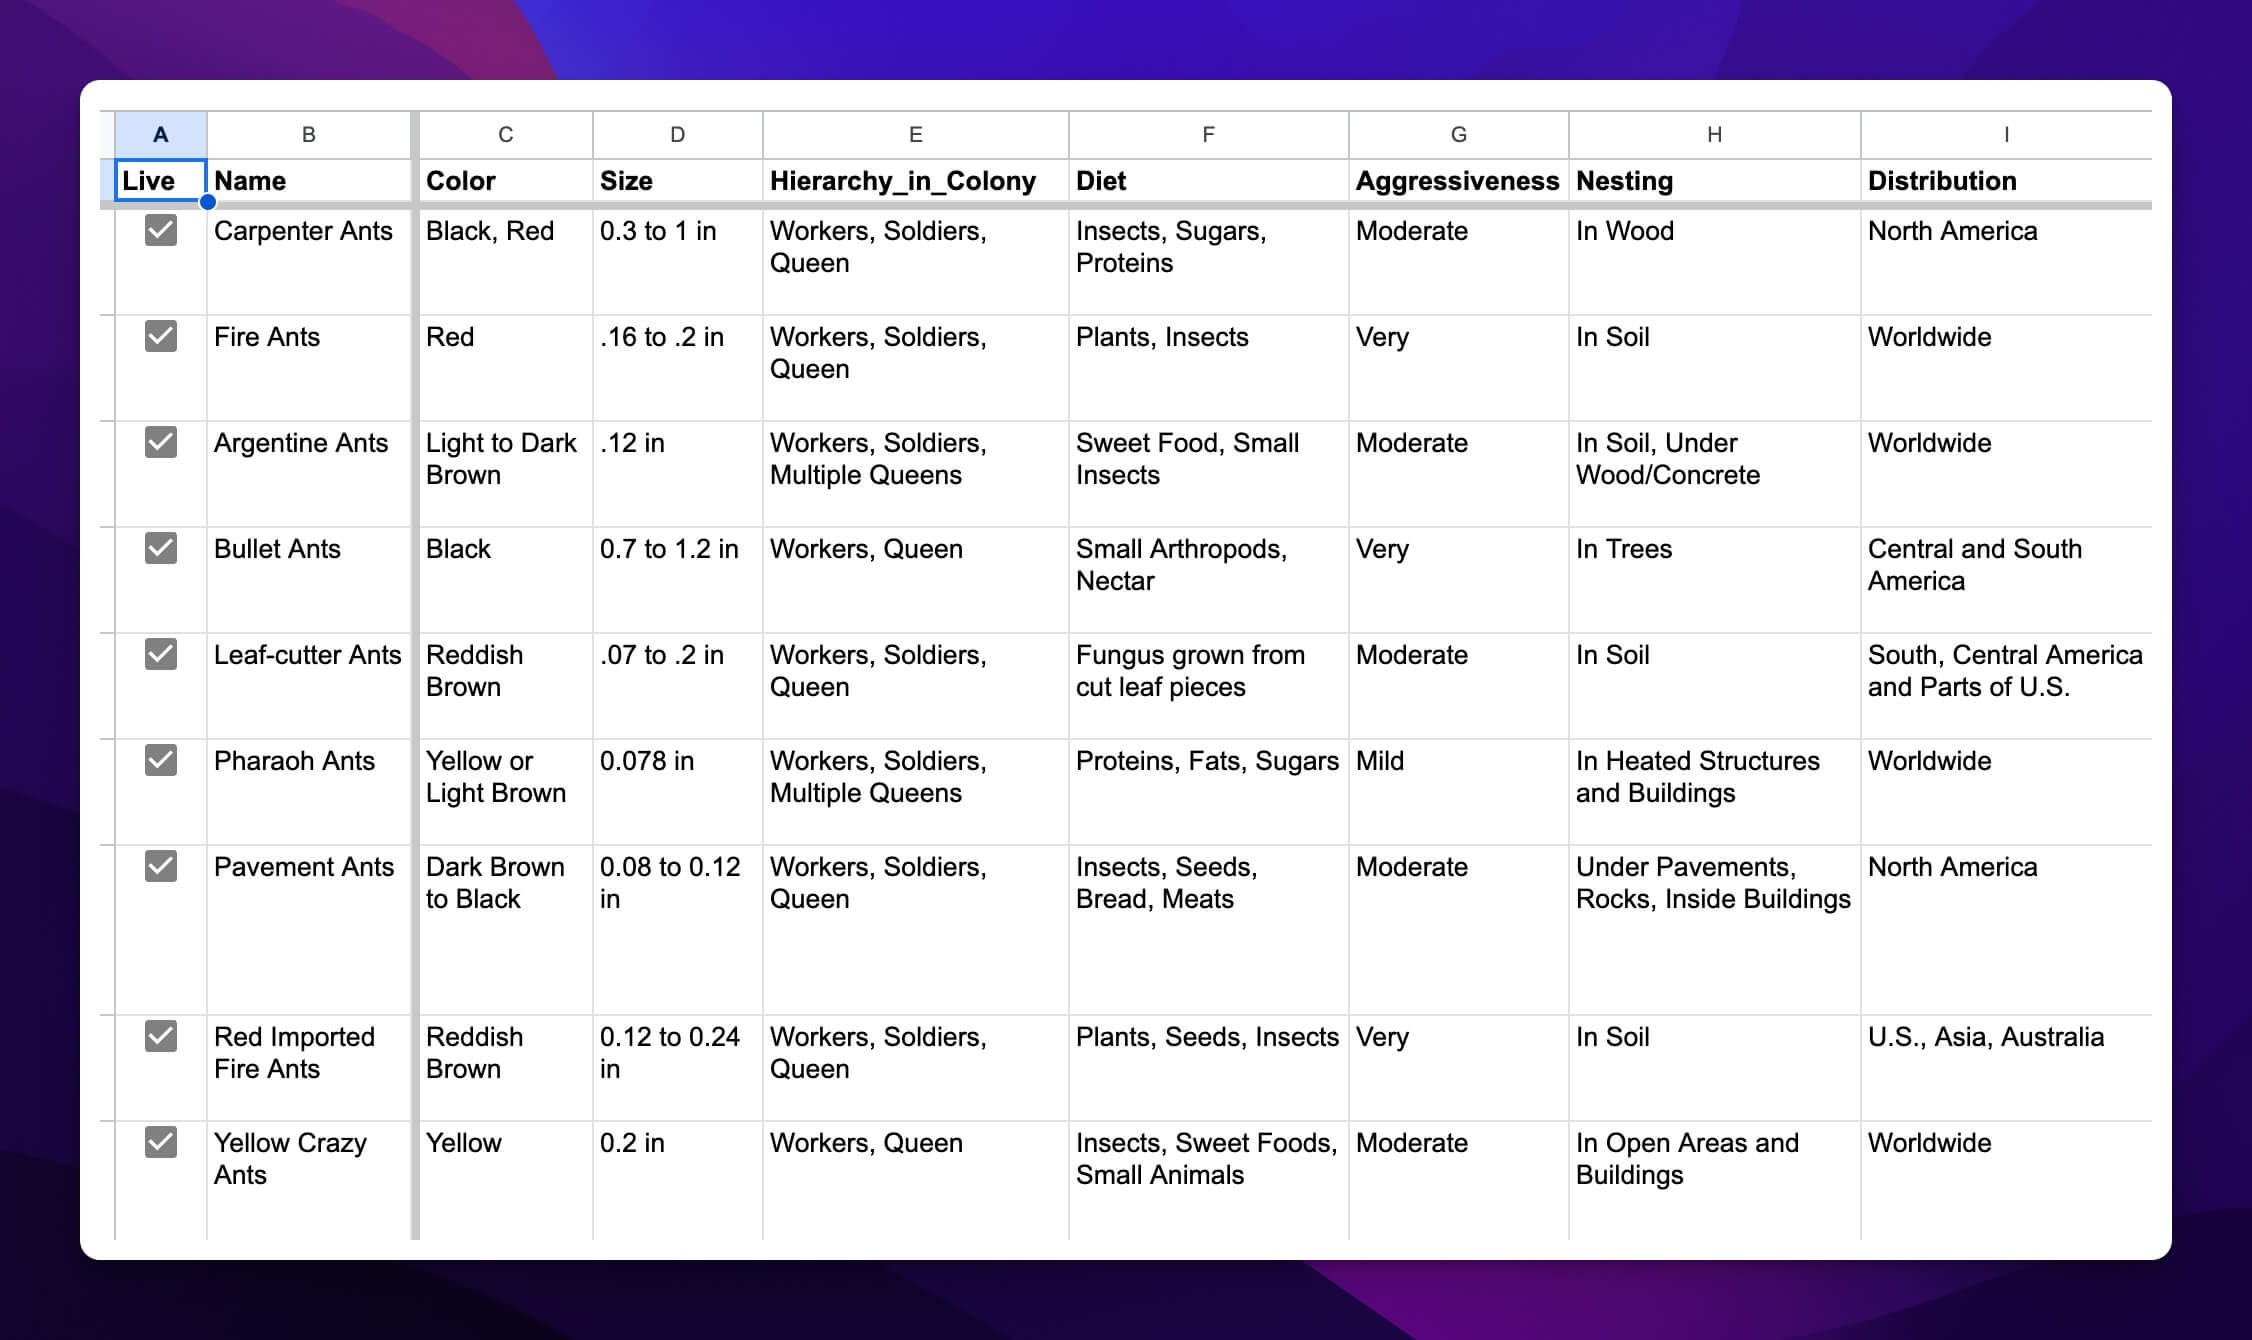
But before we move forward, make sure that you have the data ready in a Google Sheets file or as a CSV file (as shown in the above screenshot). As we will be using the data to create pages, it’s important that you have the database prepared for the project.
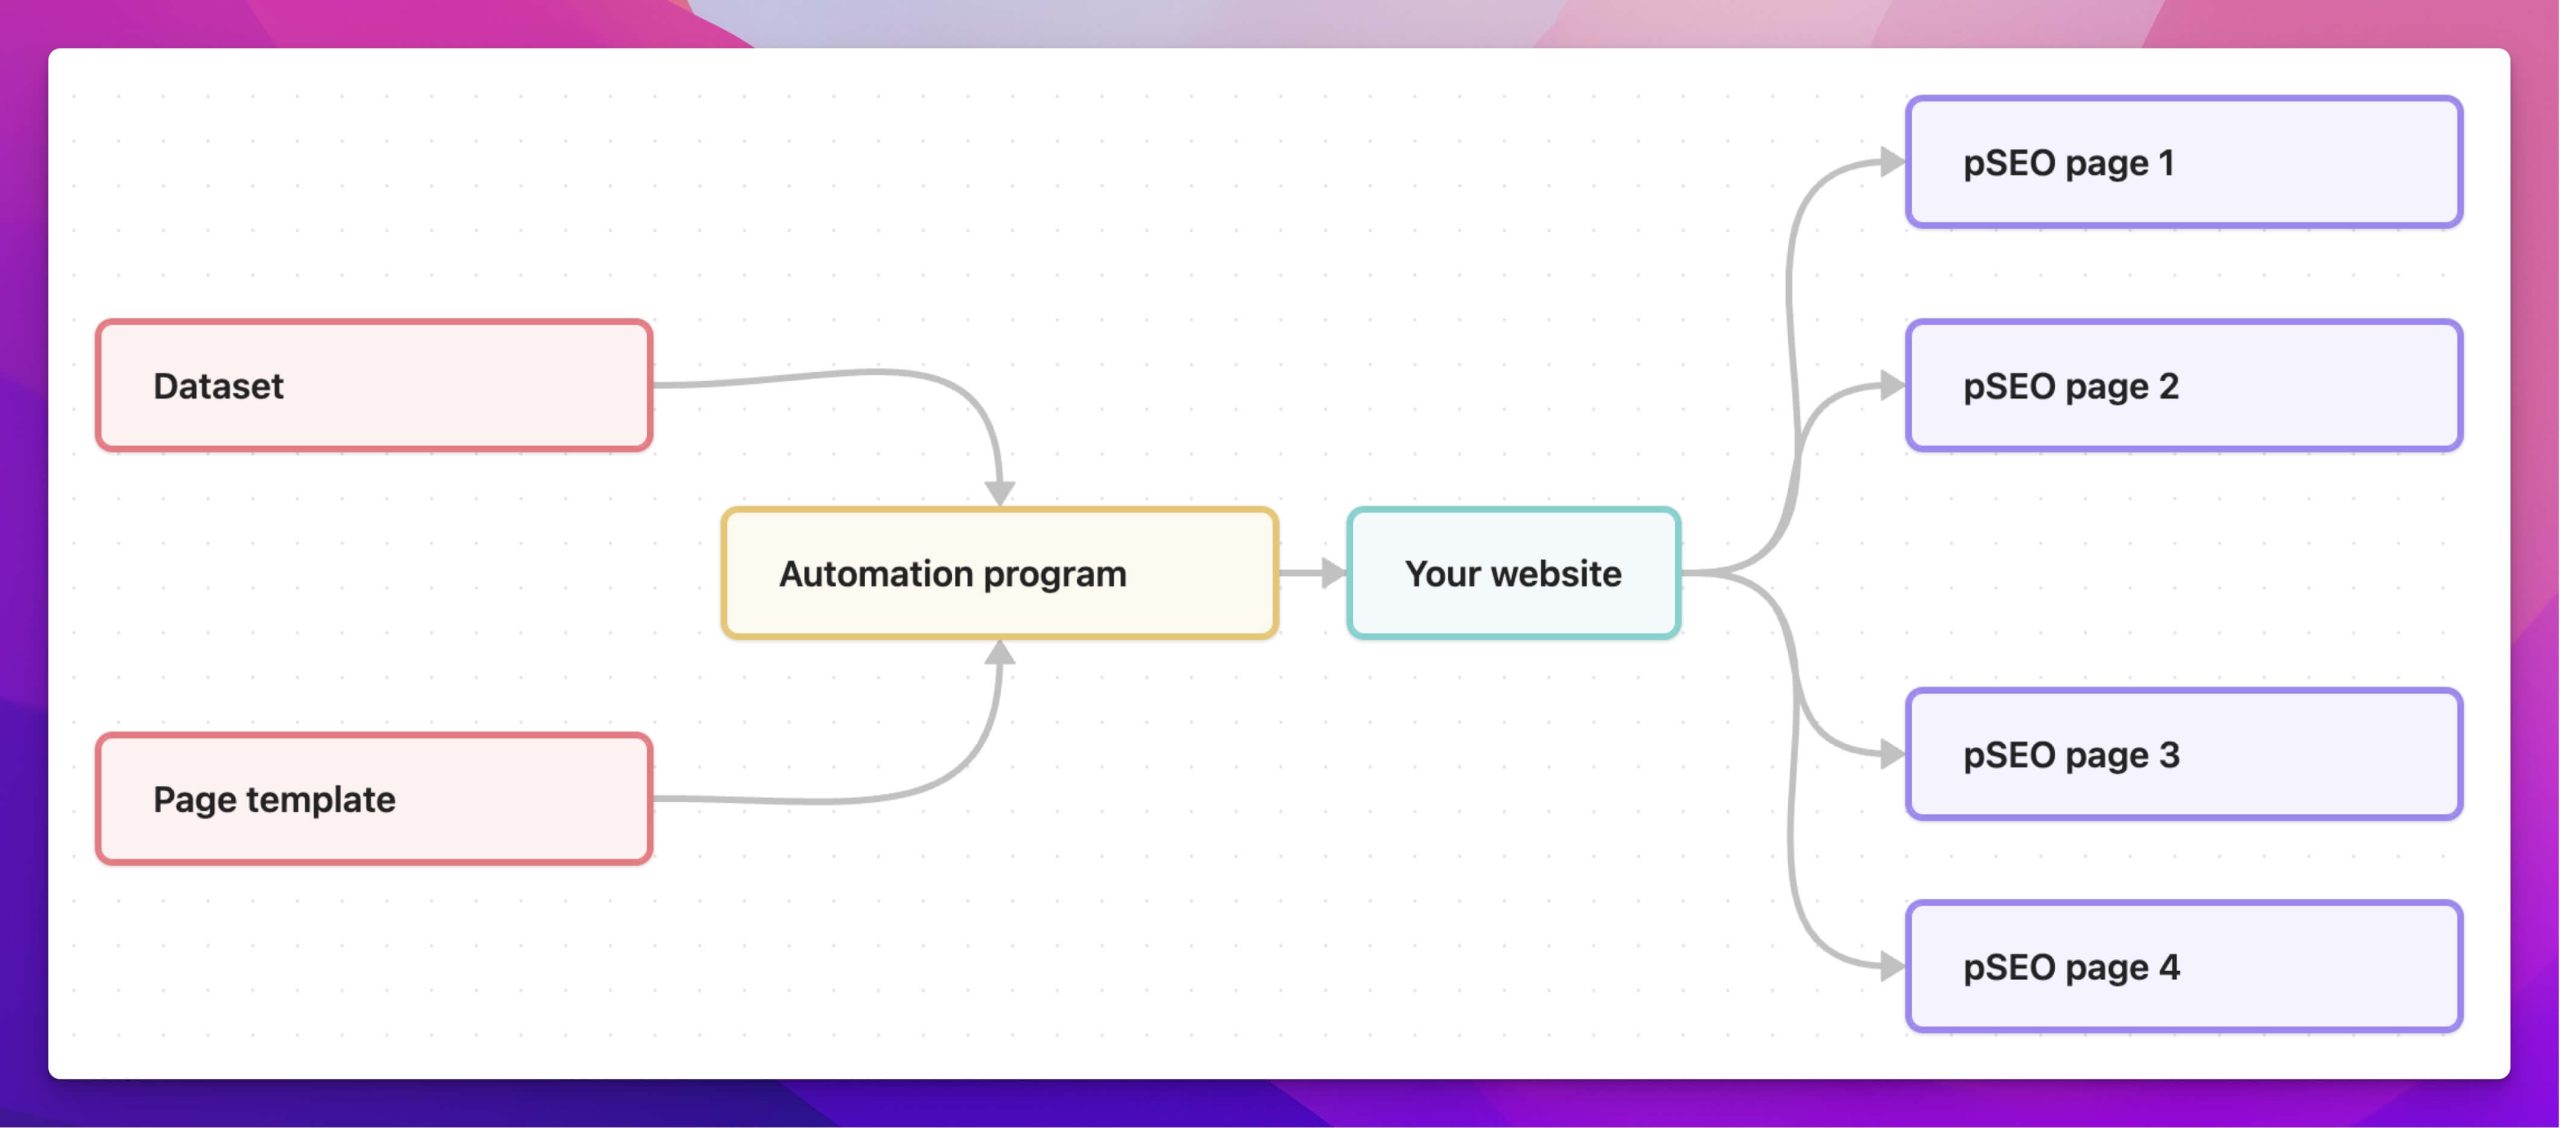
And just like any other programmatic SEO process, pSEO in WordPress is also going to be the same as shown in the diagram above.
A. By using the WP All Import plugin
WP All Import is a powerful WordPress plugin that helps you import and export 1000s of rows of data as posts, WooCommerce products, pages, categories, or even users. You can just have all the data in a simple CSV or XML file and then import everything to your WordPress site within minutes.
And with these capabilities, WP All Import is a powerful tool for implementing programmatic SEO in WordPress. Below, I will provide you with step-by-step explanations of how to use the plugin for pSEO.
1. Install and activate the plugin
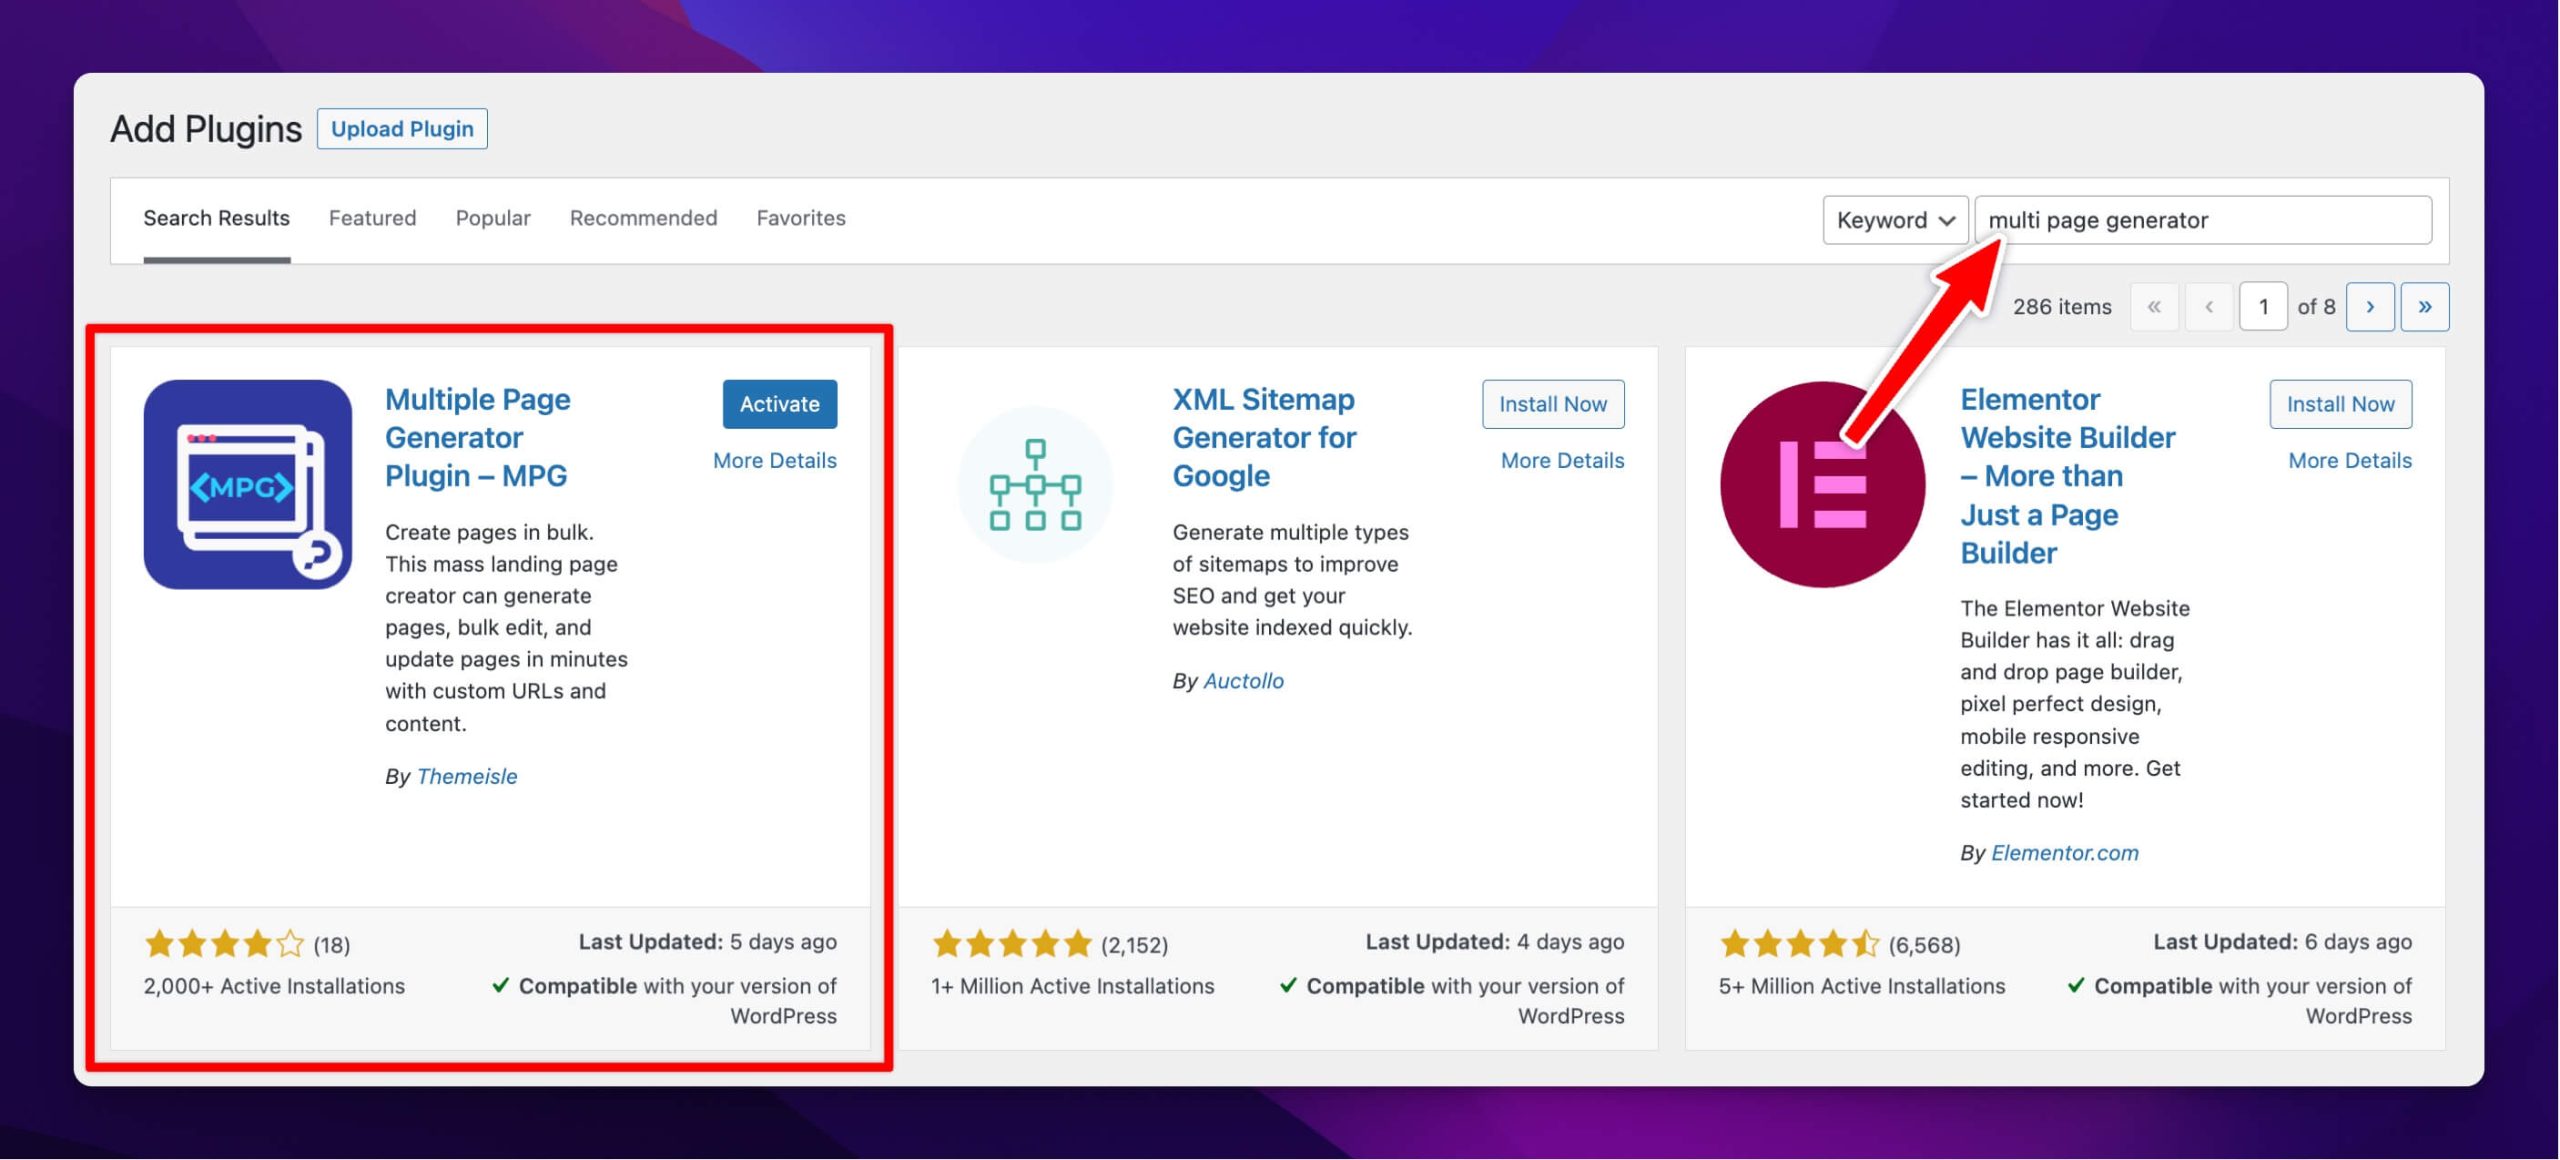
Log in to your WordPress admin dashboard, navigate to Plugins > Add New area, and search for “Import an XML or CSV file”.
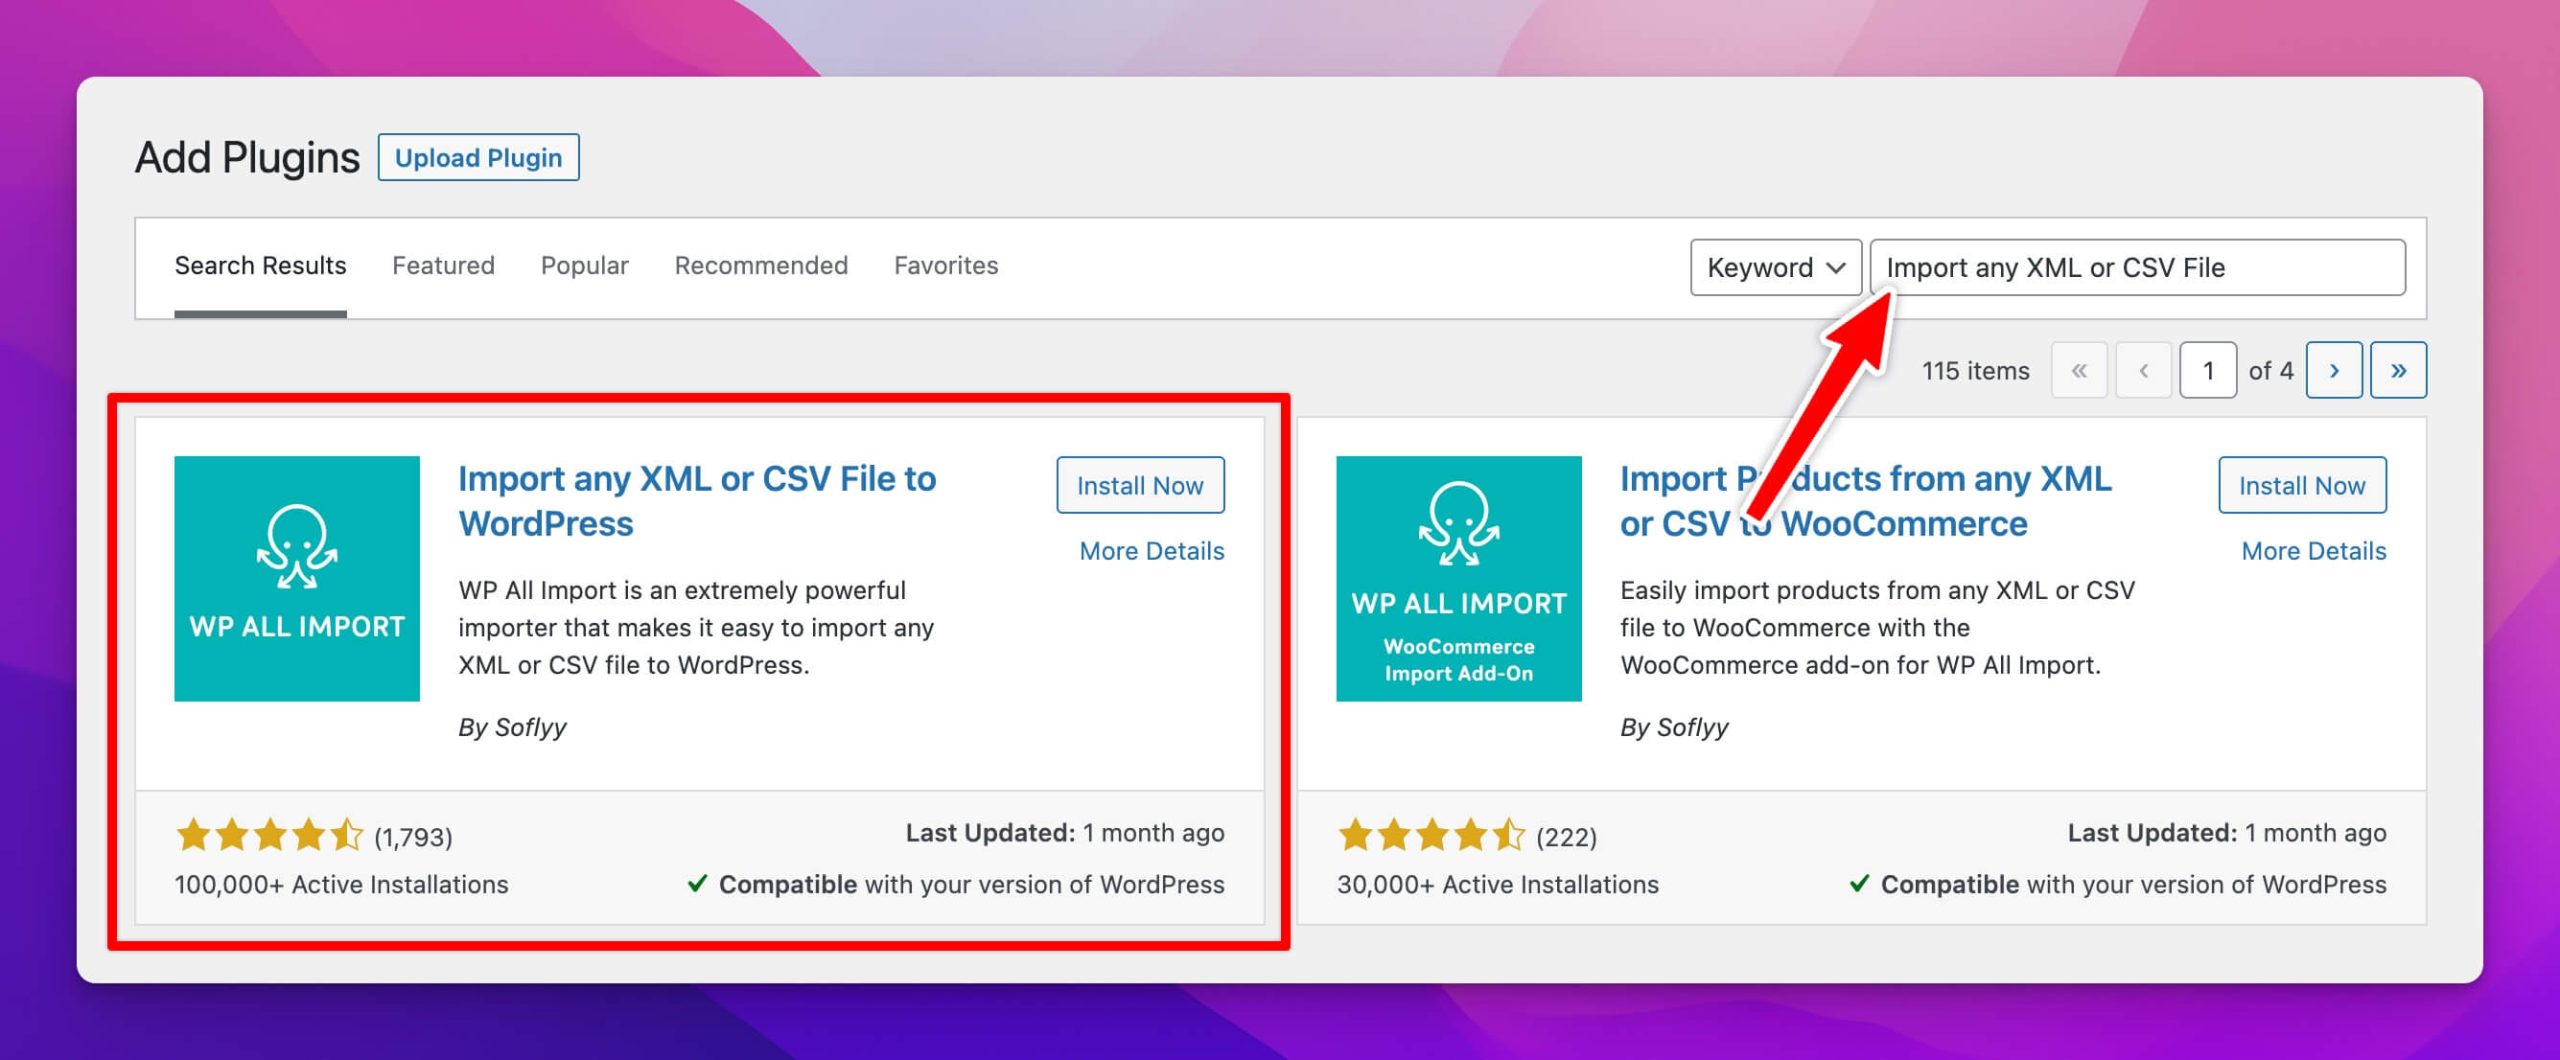
And once you find the plugin highlighted in the above screenshot, click install and then activate the plugin.
Note that the free version of the plugin has limited features and if you want the pro version, you will have to visit their official website. Ideally, I’d recommend getting the “Import + Export Pro Package” (costs $299) as it supports all kinds of imports in WordPress; but if you’ll just be creating simple posts and pages, the “Import Standalone” (costs $99) would work just fine.
2. Start a new import
After you’re ready with the plugin activation, it’s time to start a new import by navigating to All Import > New Import from the WordPress admin panel.
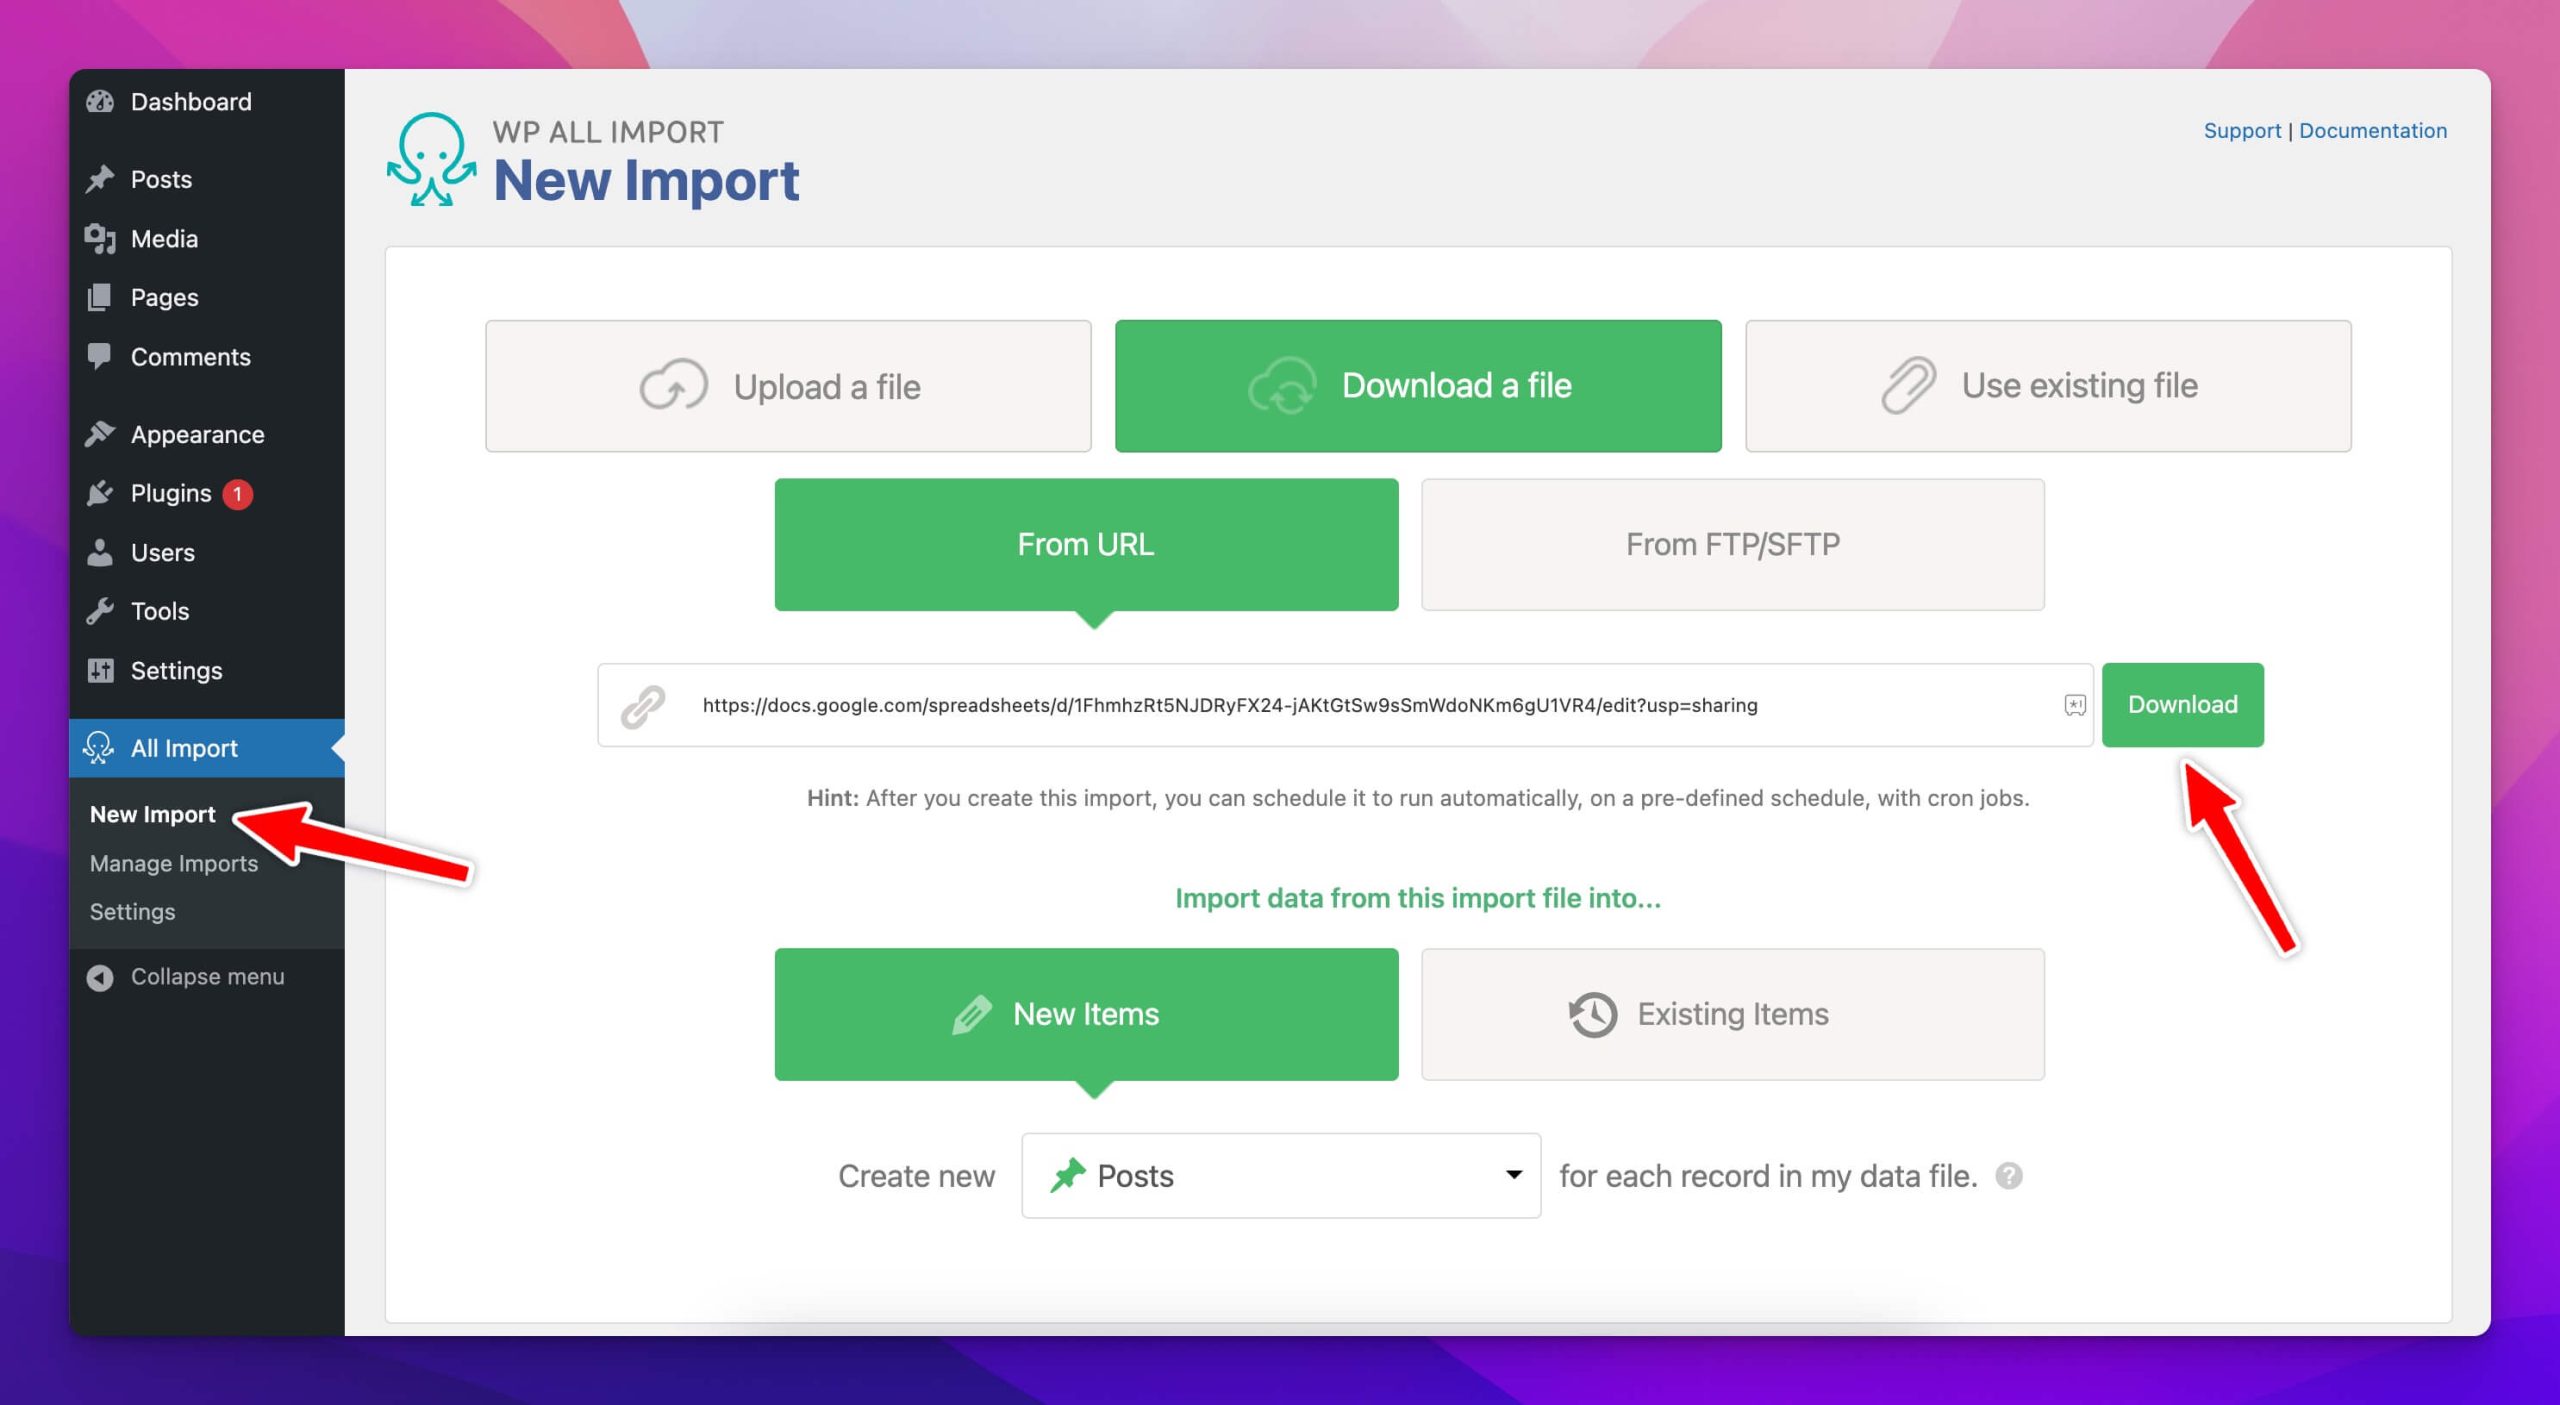
If you’re using Google Sheets as a data source, then first, you have to make your Google Sheets file with “Anyone with the link – can view” permission, and then go to Download a file > From URL and paste the file link. But if you’re using a CSV or XML file from your computer, you will have to select the Upload a file option and then proceed further.
You will also have to select whether you want to create posts, pages, custom post types, or something else, as shown in the above screenshot. After that, just click on the Continue to Step 1 button.
I recommend going with Google Sheets instead of a CSV file because when you add more data or make any changes to your data, you can just rerun the import and the plugin fetches all the changes in the file. And that isn’t possible with local CSV/XML files.
3. Set up filtering
If you want to publish pages that only meet certain criteria, you can do that as well. Just scroll down to the Add Filtering Options on the second screen and set up the filter that you want.
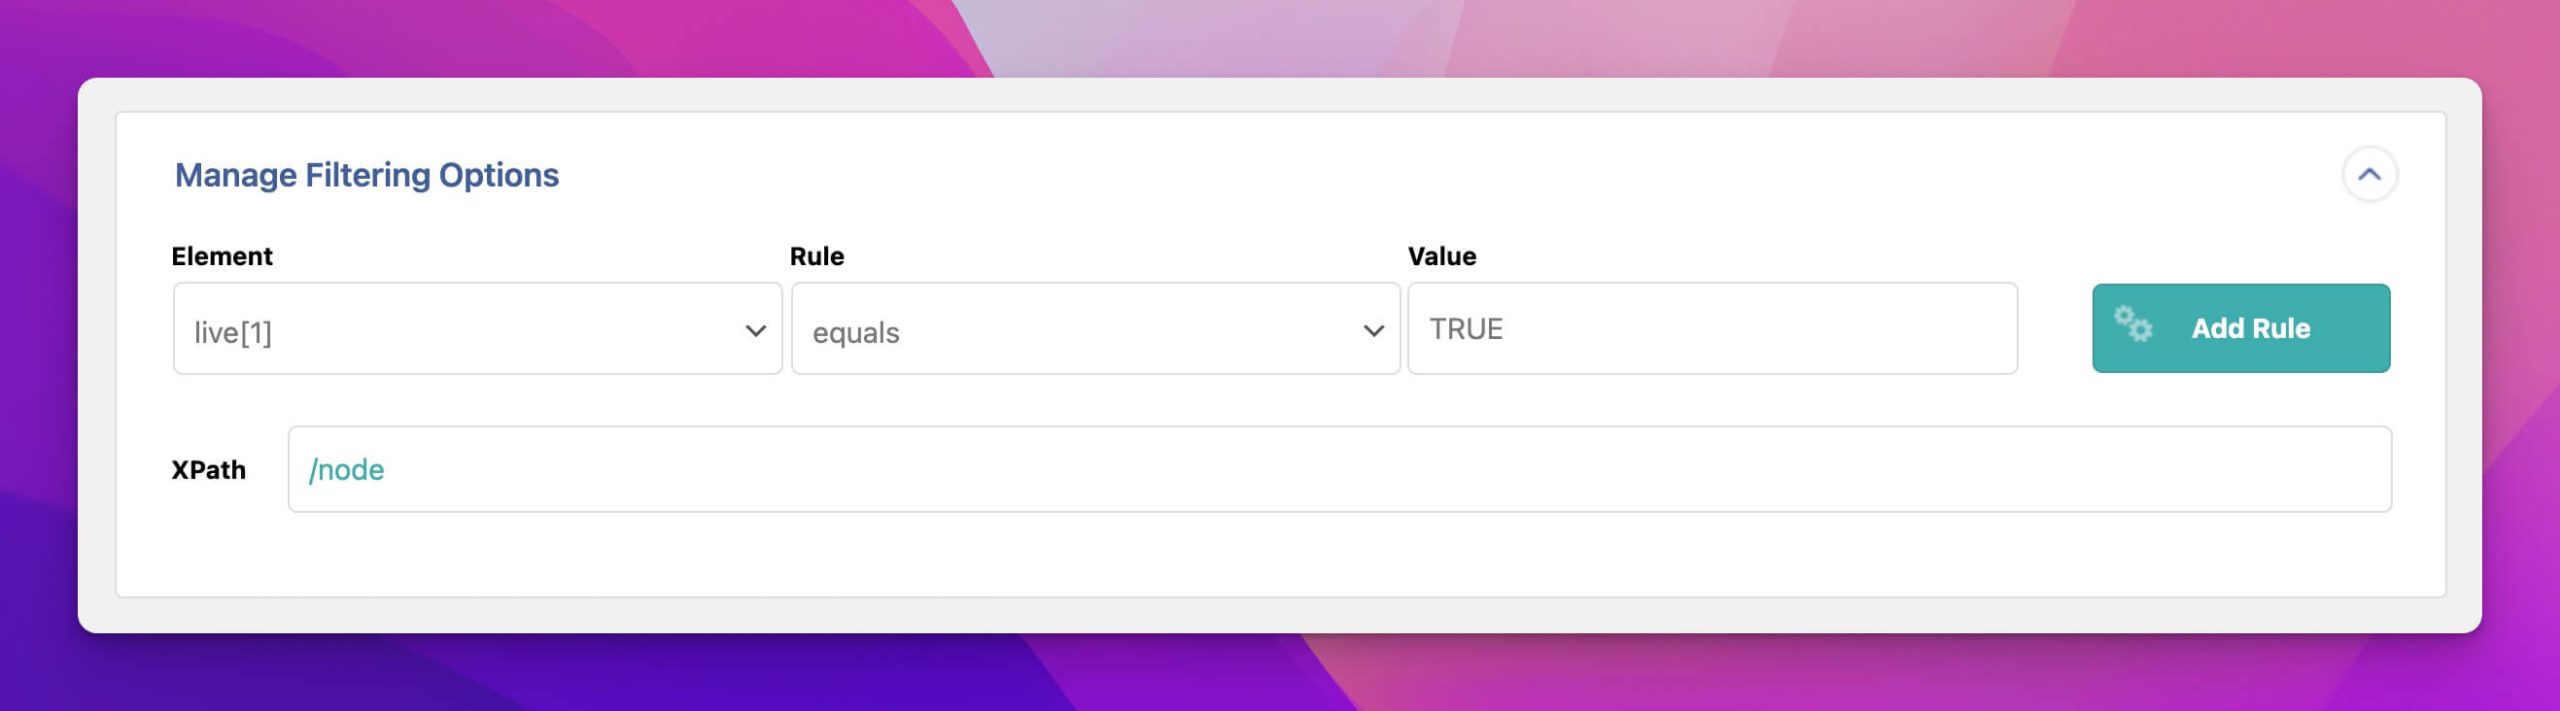
I always add an extra column in my data in Google Sheets as checkboxes or tickboxes and then set a filter to only import rows where those checkboxes are checked.
But note that this step is entirely optional.
4. Create the page template
Now, it’s time to create the page template based on how you want your programmatically generated pages to be structured and look. And while designing the page template, you have all the data from your connected file available on the right side, you can drag and drop any variables you want.
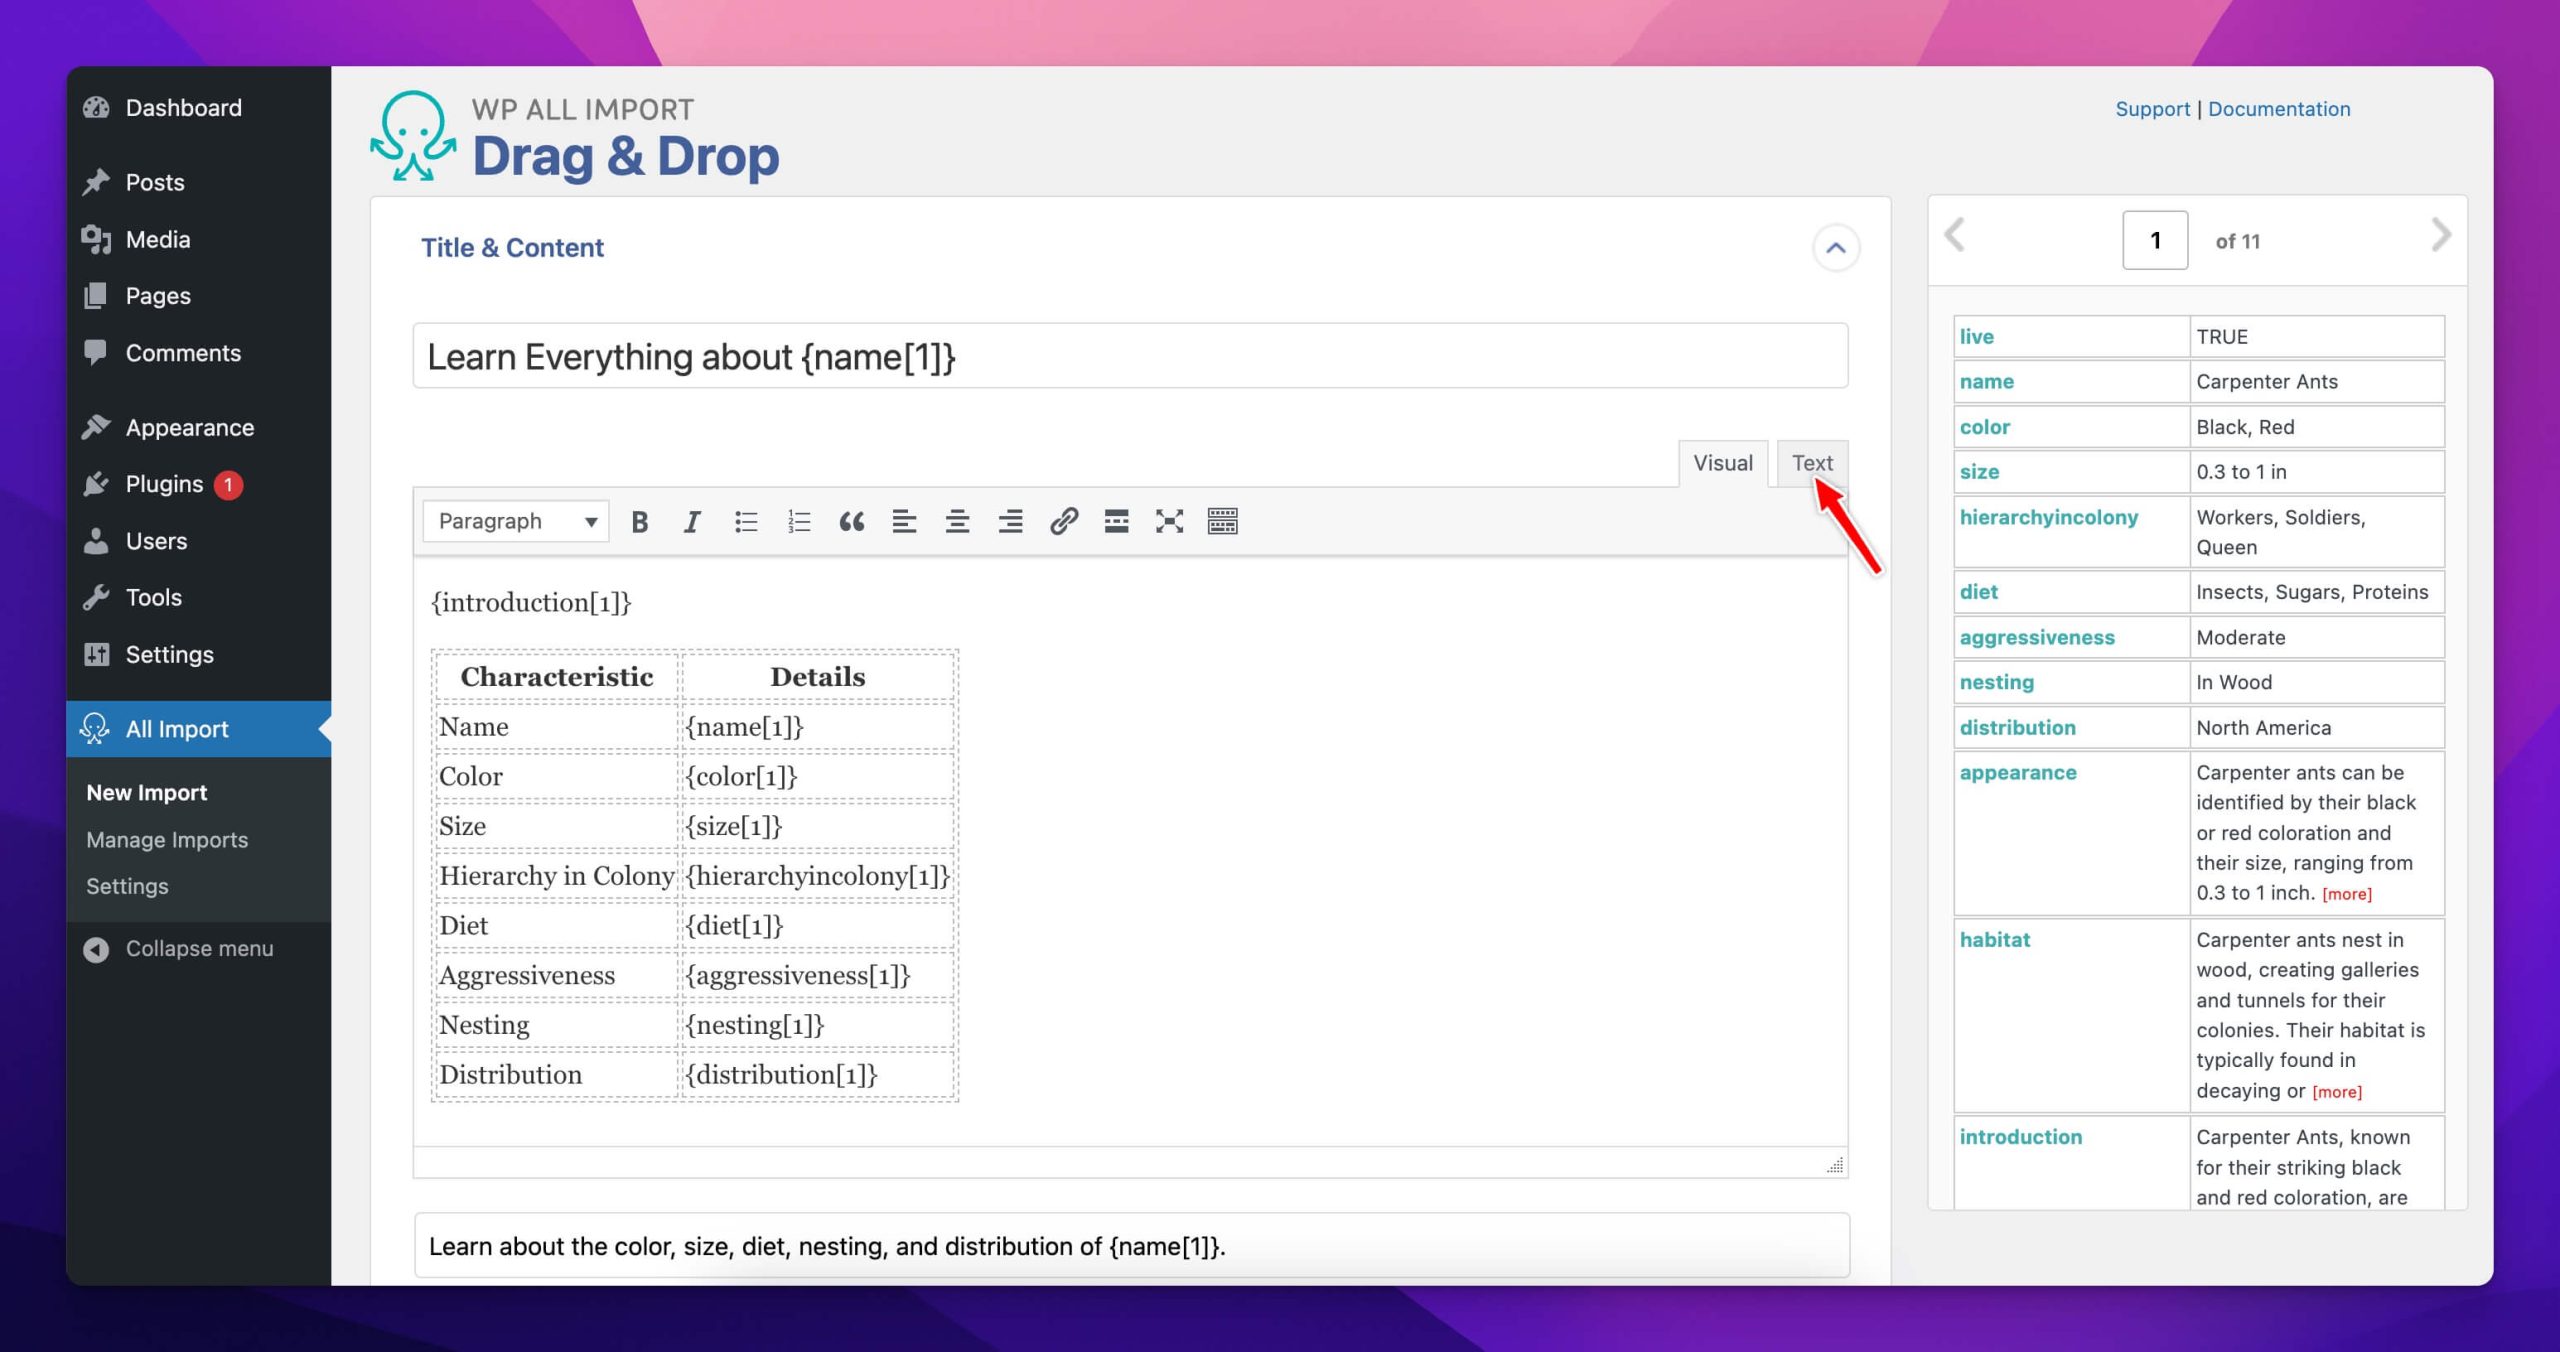
Start writing the title and then creating the content of the page as shown in the above screenshot. You may also need to use the “Text” section of the Classic Editor to add tables and some custom styling on the page.
5. Dealing with images
Dealing with images can become tricky, but it doesn’t have to be. For images, you have 3 options available:
- Download images hosted on external servers while running the import
- Already upload the images to the media library and refer to them by their names in a column in your database
- Upload images to the
wp-content/uploads/wpallimport/files/folder and then refer to them by their names
Above is a video showing how you can deal with images when doing pSEO on your WordPress site.
I prefer the #1 option, as it’s the easiest and has the lowest chances of broken images. But you will have to find a way to upload all the images to a server and then get their URLs. However, option #2 also works fine if you have ensured that the filenames of all images are unique, and you have correctly referred to their names in your database.
After setting up image(s), don’t forget to set their Titles and Alt Texts under SEO and Advanced Options.
6. Taxonomies and categories
If you’re creating regular posts or posts for custom post types, you will have to set up tags and categories under the Taxonomies and Categories section.
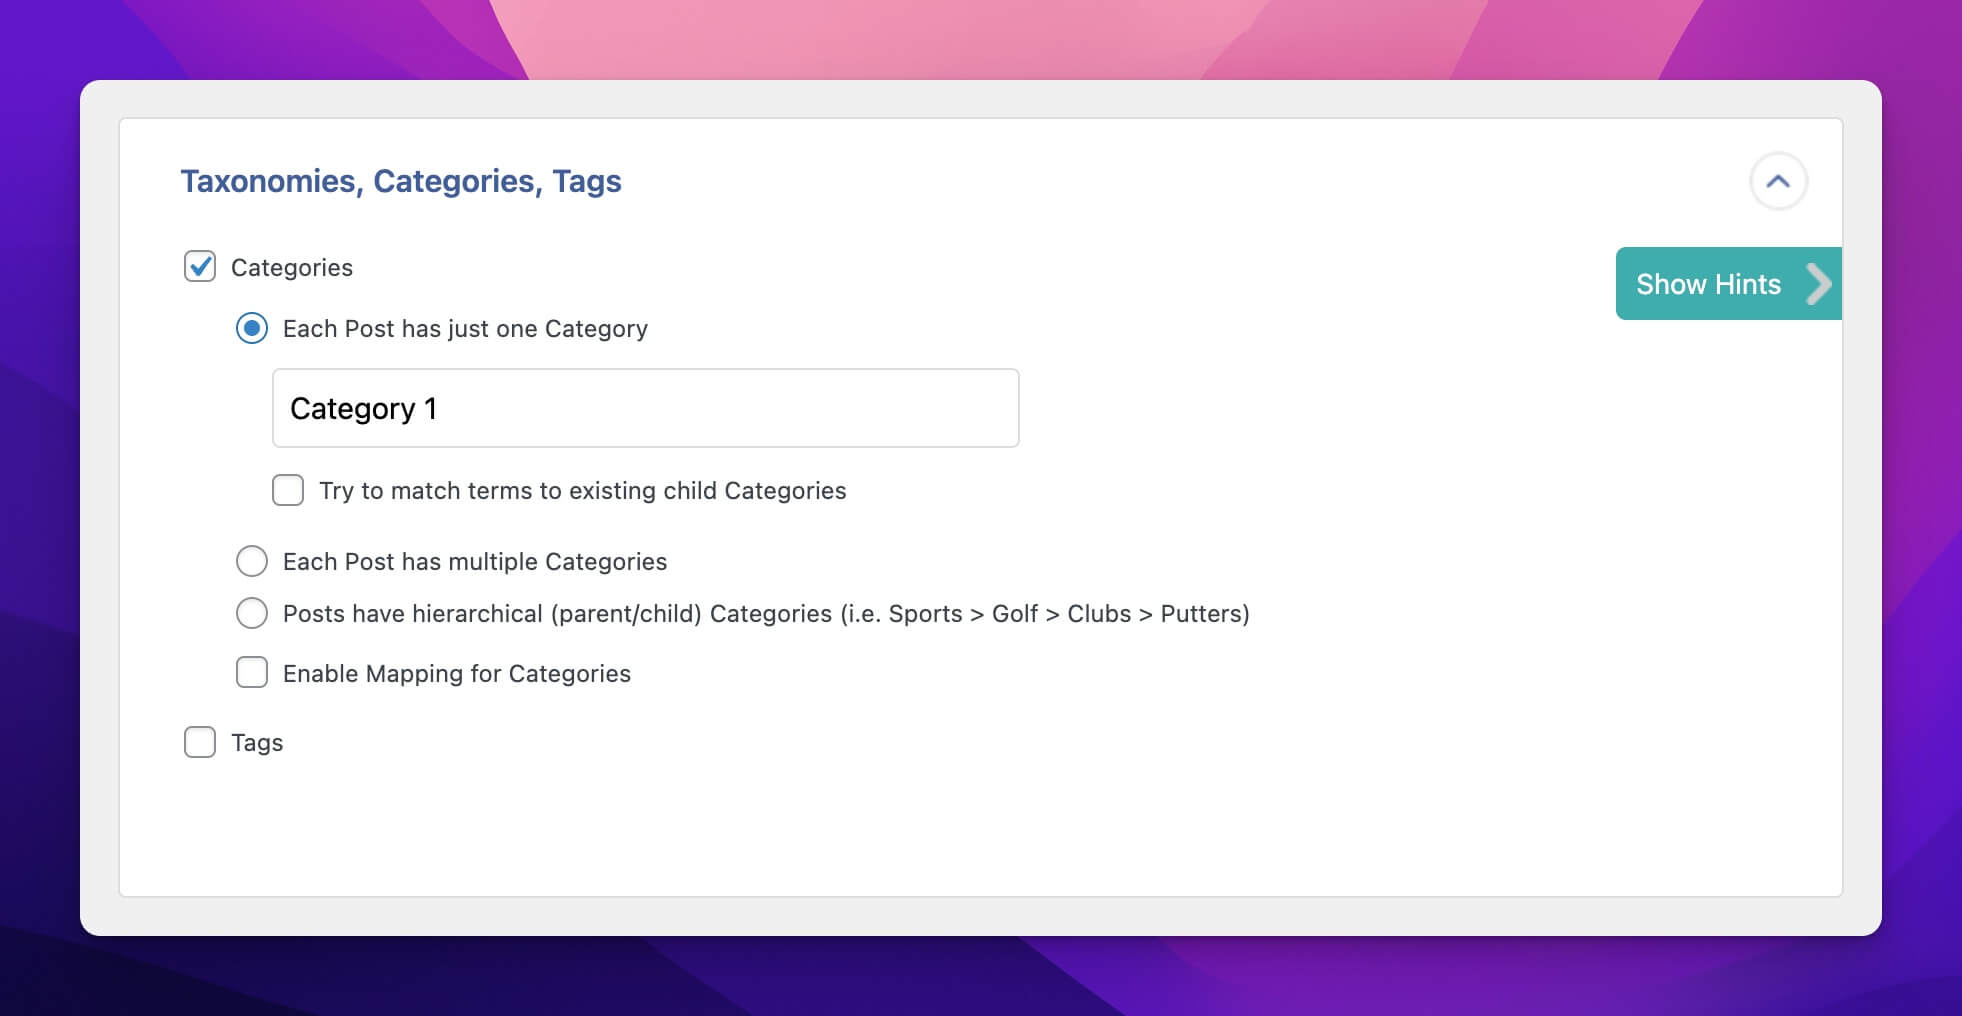
If all the posts/pages that are going to be generated will have only one fixed category, you can just write the category name in the field as shown above. But if there are going to be multiple categories, you can specify the categories separated by commas.
And the best thing?
You can also pass dynamic categories from your database; for that, you will have to specify the variable name in the category field. If the category field in the database was called “category” then you’ll have to write {category[1]} in the field.
7. Set up the post options
Under the Other Post Options section, you will have to specify some important information about generated posts. Let’s talk about them one by one:
- Post Status: Keep this as “Published” if you want to automatically publish your posts as you run the import.
- Post Dates: Generally, selecting “now” works the best but you can specify dates when you want your posts’ published dates to be.
- Comments: You can show or hide comments on your posts from here.
- Pingbacks and Trackbacks: Again, you can enable or disable pingbacks and trackbacks from here. I keep them as “Closed”.
- Post Slug: If you have created slugs in your database then pass that variable, or just pass any text and WordPress automatically converts them to slugs.
- Post Author: Specify the post author here; you can just write the author’s username in the field.
- Page Template: If you’re using different page templates, select the template here, otherwise leave it at Default.
After this, continue to the next step.
8. Start generating posts in bulk
On the new page, just click on the Auto Detect button for setting up Unique Identifiers for posts. Generally, I put the slug field in there.
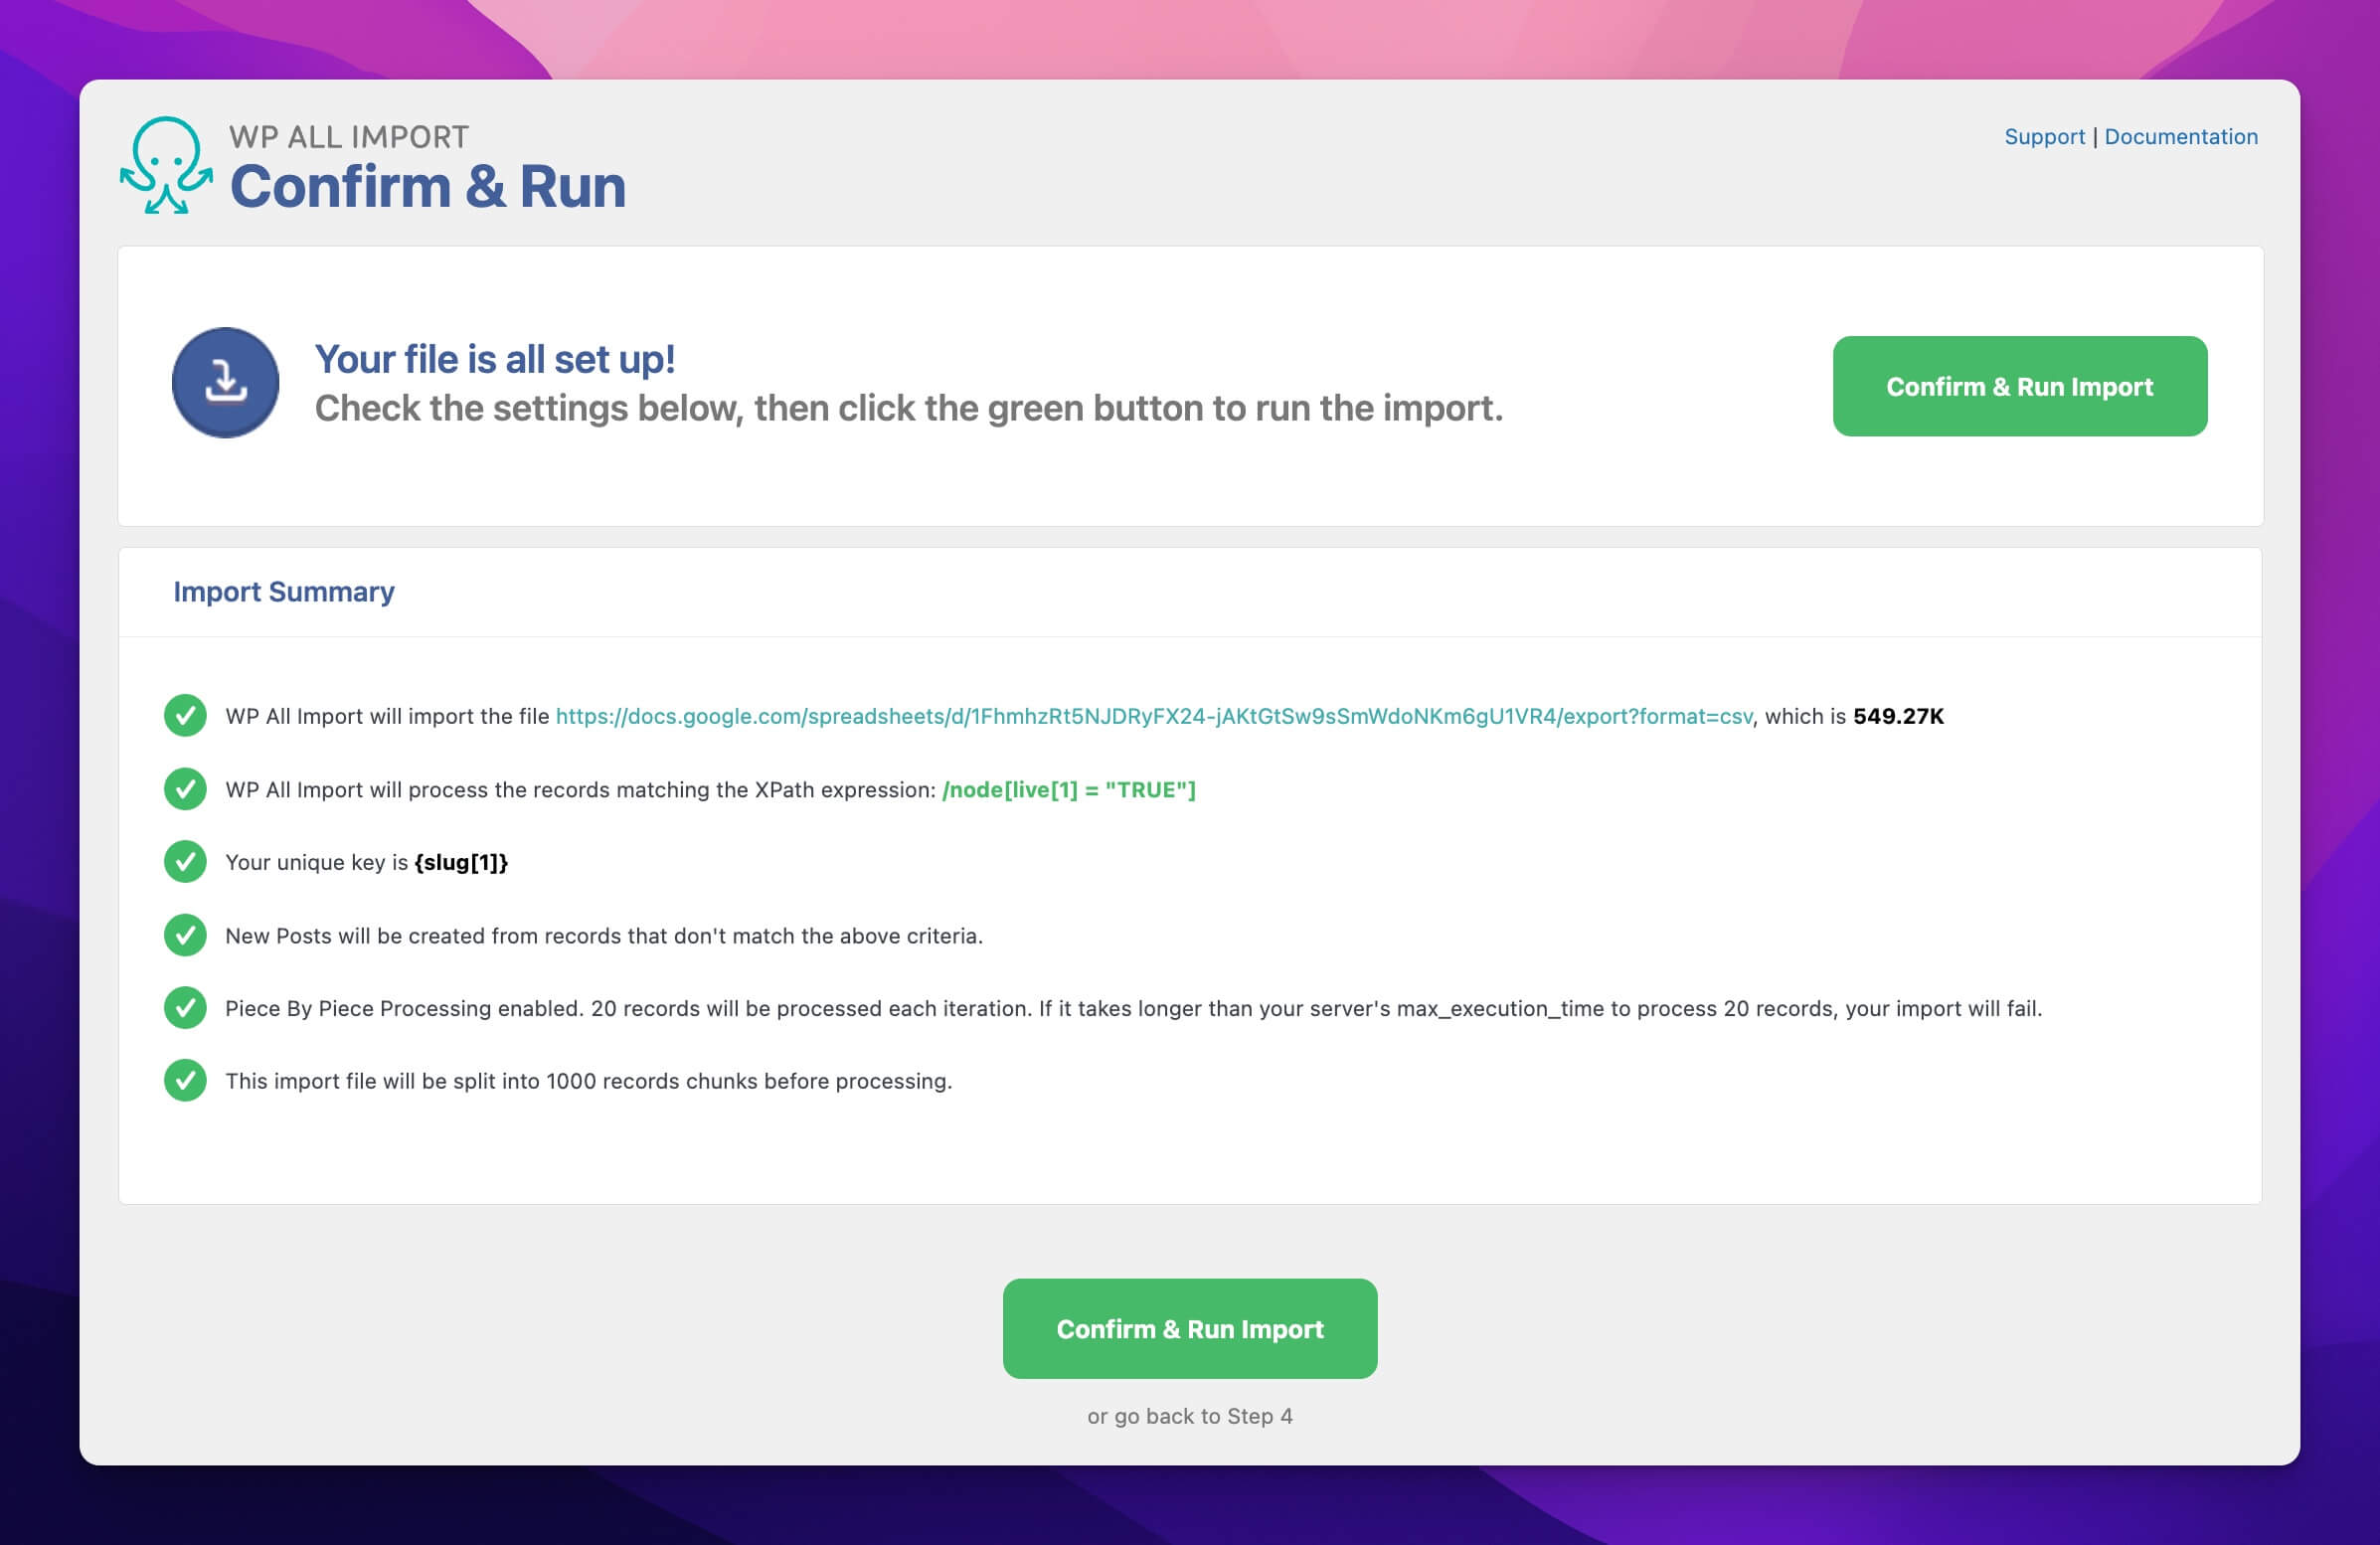
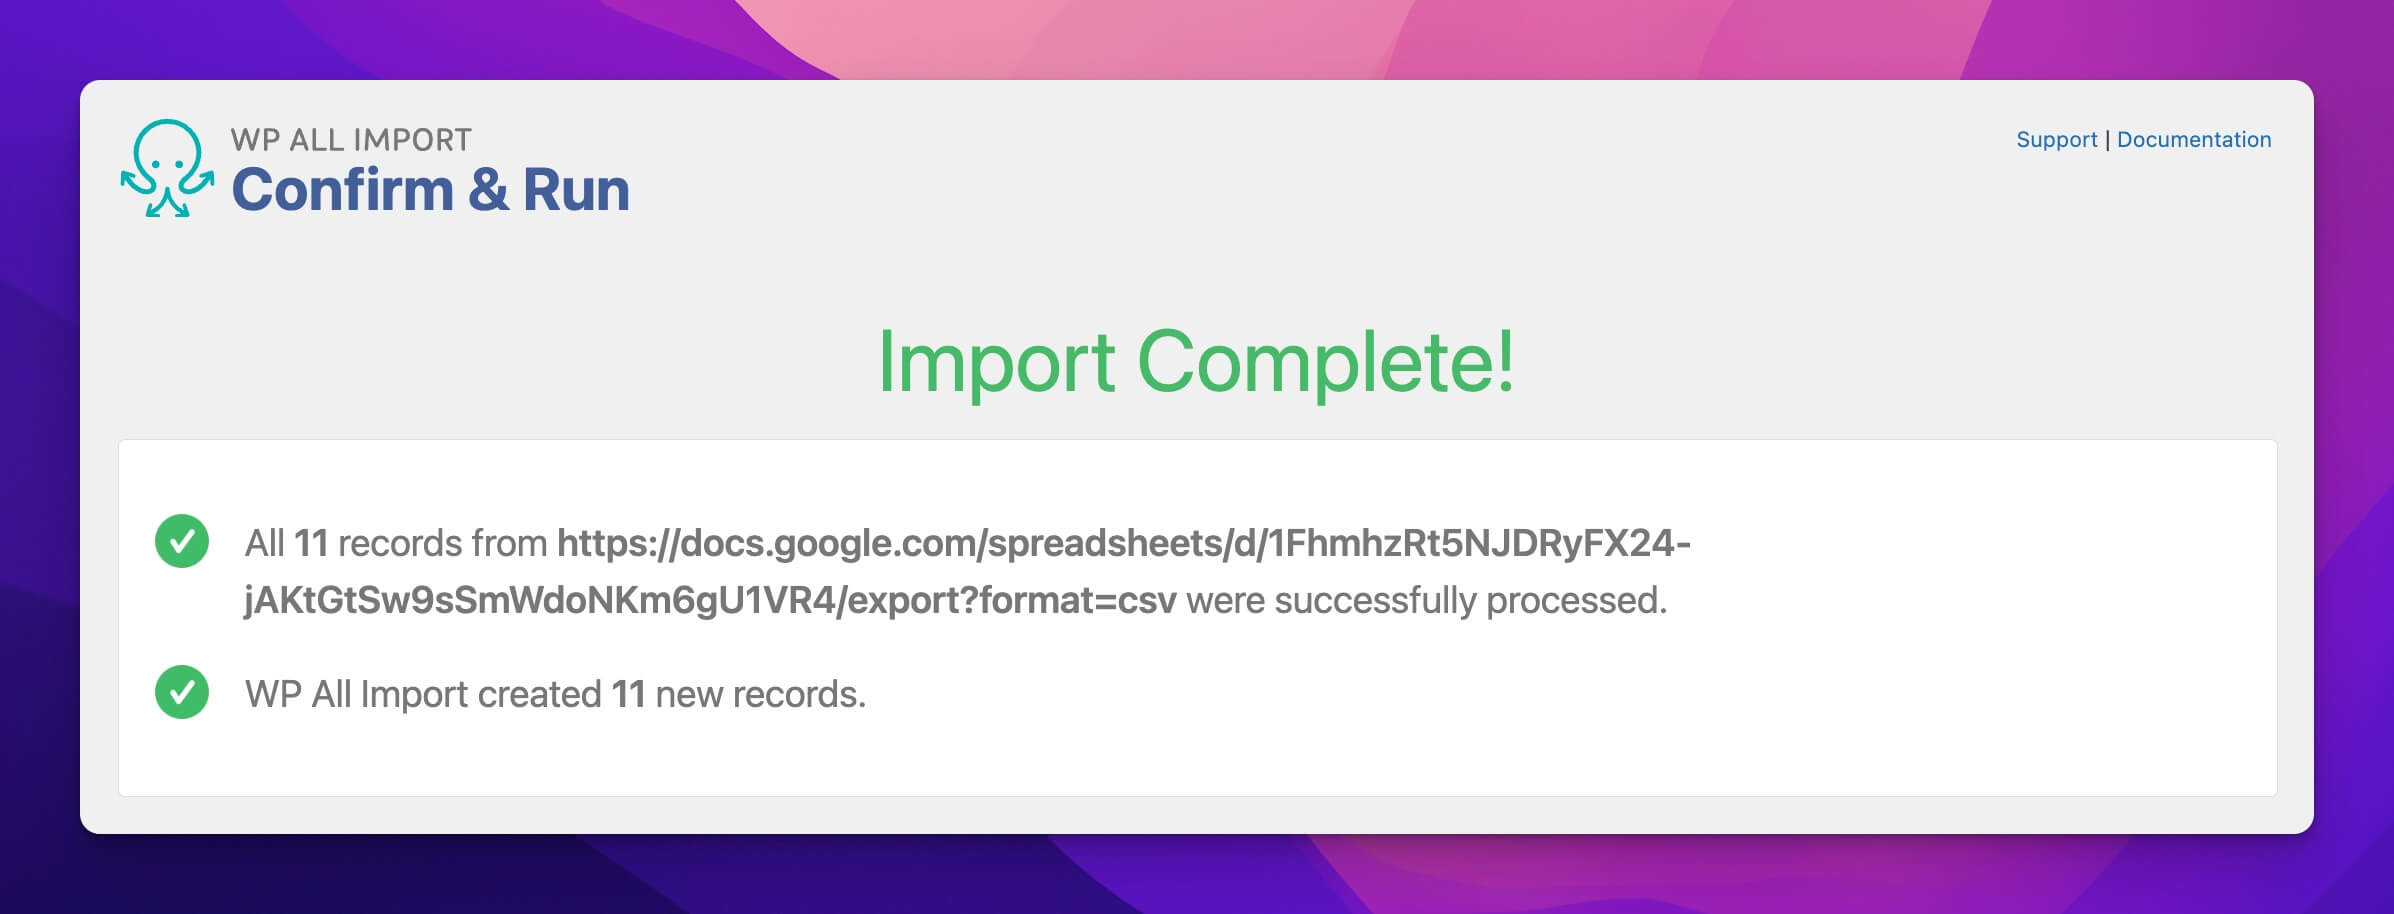
After that, just click on the Continue button and you’re all ready to run the import. You will be shown the below screen where you have to click on the Confirm and Run Import button, and the import process will get started.
The screen will keep showing you the current progress on pages being generated, and then the import complete screen will be shown after the import is complete (see the below screenshot).
And you’re done!
The import process can take somewhere from just a few seconds to several minutes and even hours depending on the size of your database.
You should now have all those generated pages on your website. You should be able to see generated pages under posts, pages, or custom posts depending on your selection in step #2.
B. By using Multi-Page Generator
Multi-Page Generator or MPG is another excellent plugin that can help you implement programmatic SEO on your WordPress sites. The plugin is developed by Themeisle, a well-known company for developing premium WordPress themes and plugins.
MPG has a few advantages over the WP All Import plugin, but it has some disadvantages as well. And the pSEO setup using the plugin is a bit different too.
Below, I will provide you with step-by-step explanations on how to use the Multi-Page Generator plugin for pSEO in WordPress.
1. Install and activate the plugin
First of all, install and activate the Multi-Page Generator (or sometimes it’s called Multiple Page Generator) plugin on your WordPress site.
Again, the free version is very limited, and you will have to visit their official website to get the pro version of the plugin. If you’re planning to use the plugin on a single website only, then it will only cost you $99/year.
2. Create the page template
To create the page template, you need to create a normal page/post on your website with variable placeholders. If you will be creating pages, then navigate to Pages > Add New and if you will be creating posts, then navigate to Posts > Add New, and start designing the page template the way you want.
One best thing about MPG is that you have the complete freedom to use the block editor and design the template however you want. You can even use page editors like Elementor and Oxygen Builder.
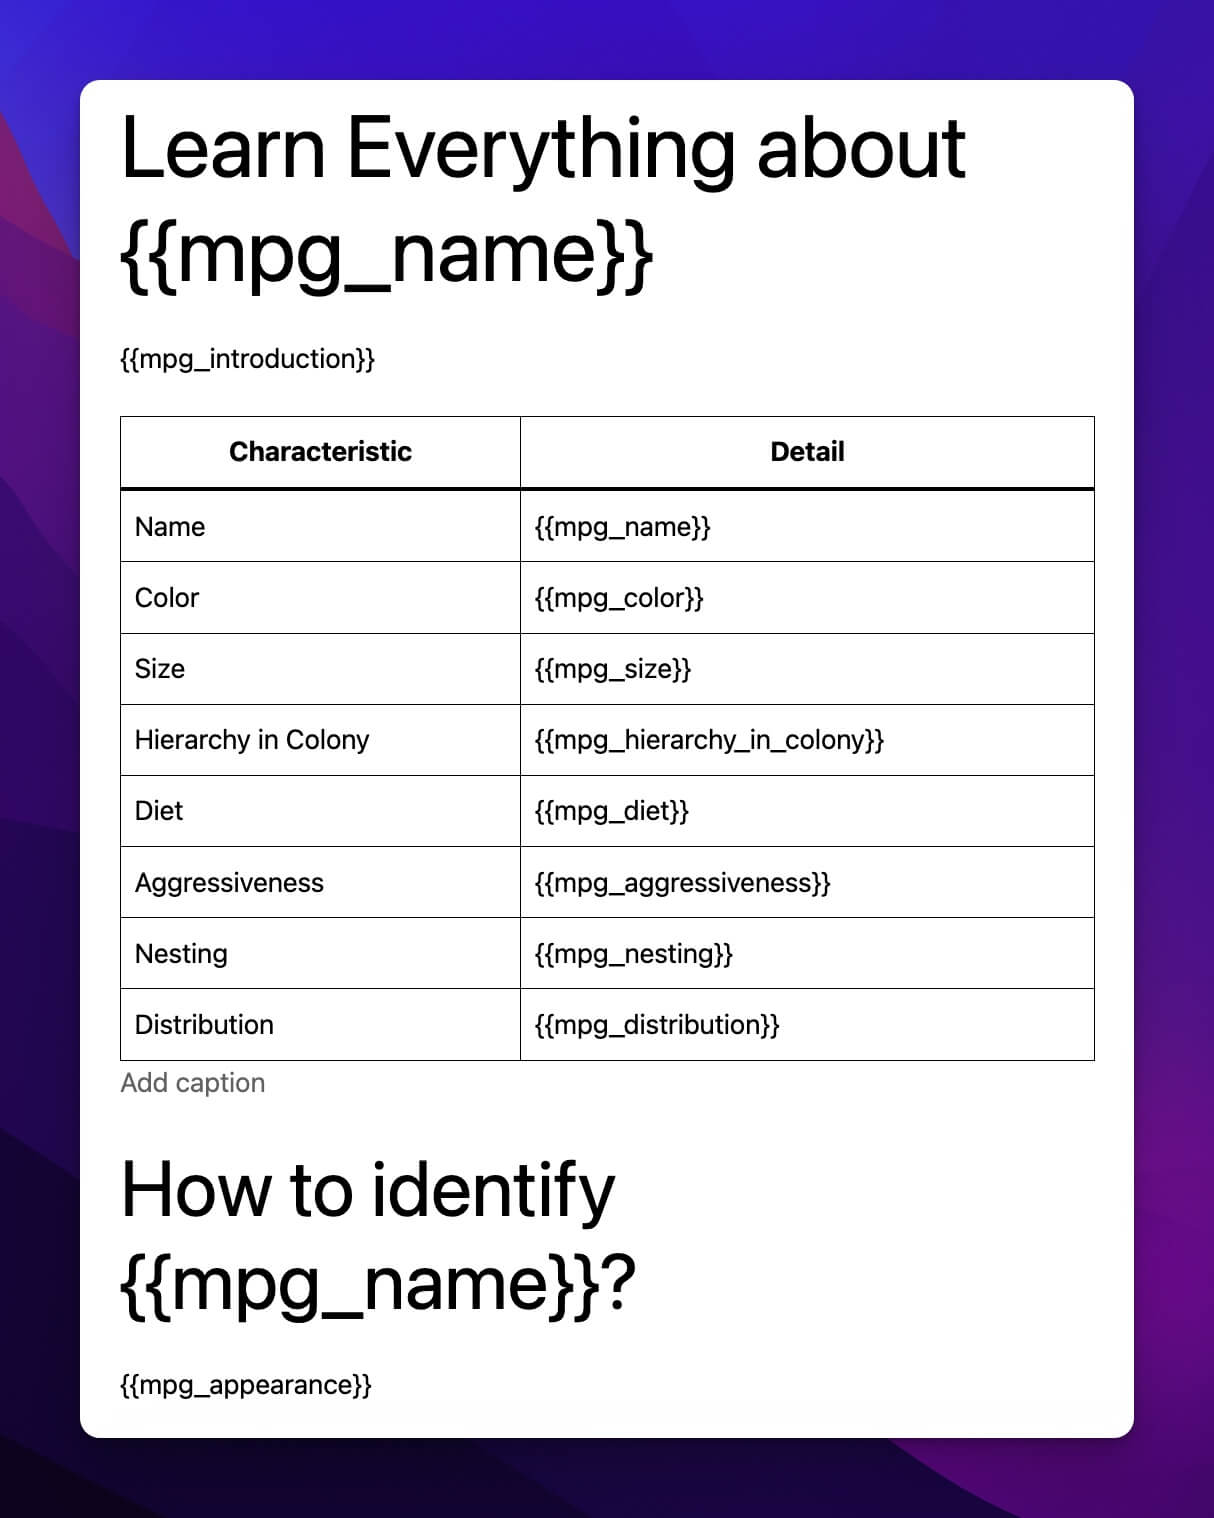
All the variables from your database look like {{mpg_name}} this when using the plugin, as you can see in the above screenshot of the page template. In this case, as I will be creating posts, so I have created a post for the template and published it.
3. Start the setup
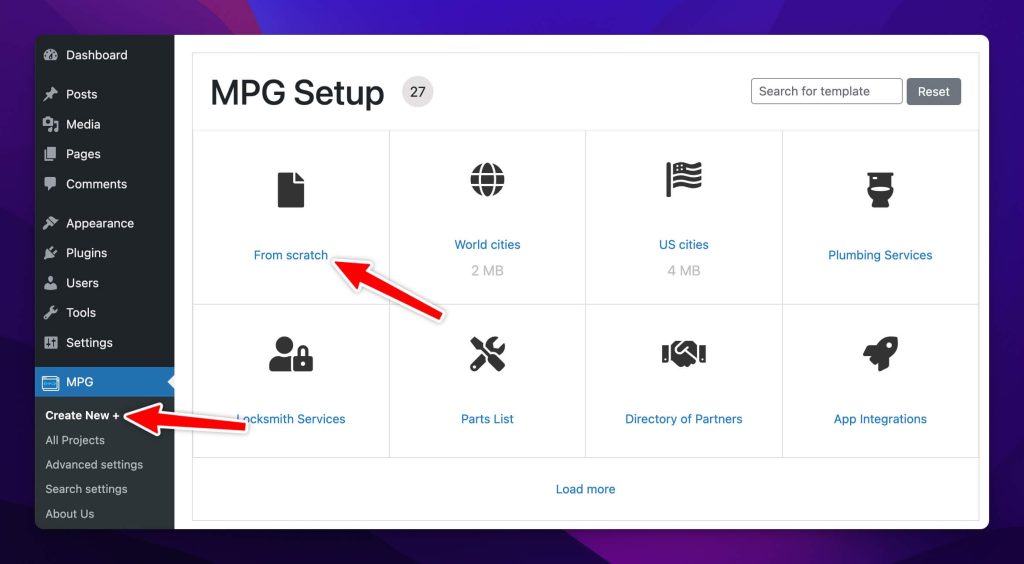
Under the menu MPG, click on the Create New + and select the From Scratch option to move forward. Give your project a name, select page/post and then select the template that you created.
Now, select the data source — if you have the data in Google Sheets, you can set the access to “Anyone with the URL can view” and then copy-paste the file URL under the Direct Link option. Otherwise, you can upload a CSV file as well. The premium version of the plugin allows you to constantly fetch the changes from your Google Sheets document.
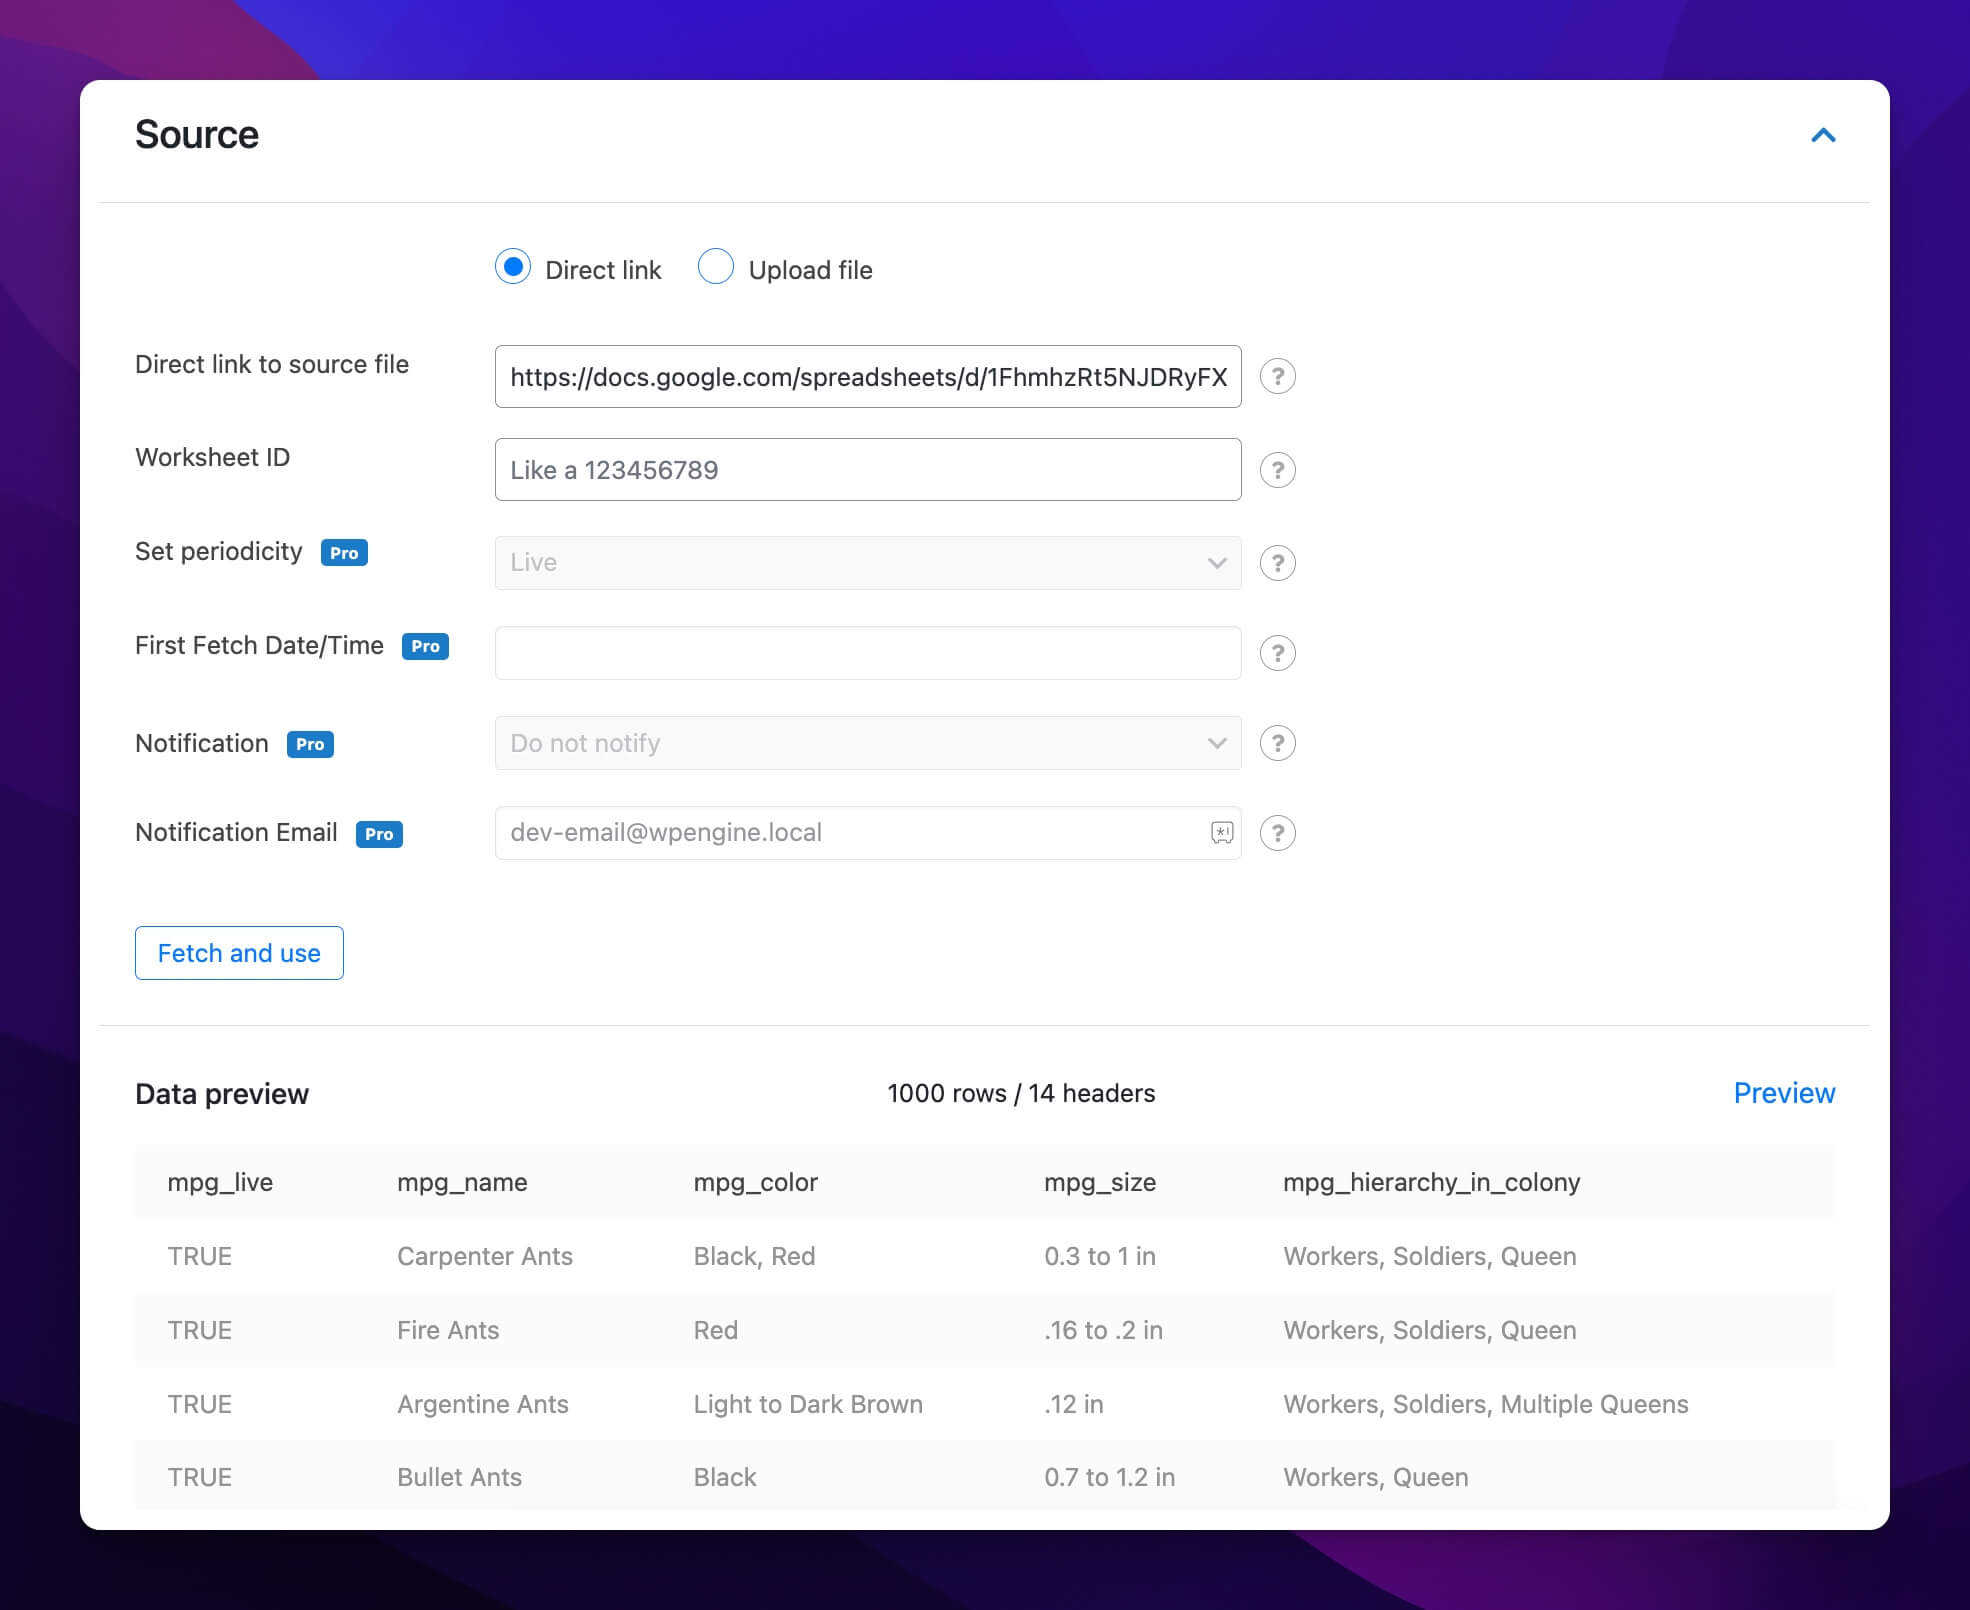
Click on the Fetch and use button, and you should now see the data from the file shown there (as shown in the screenshot above).
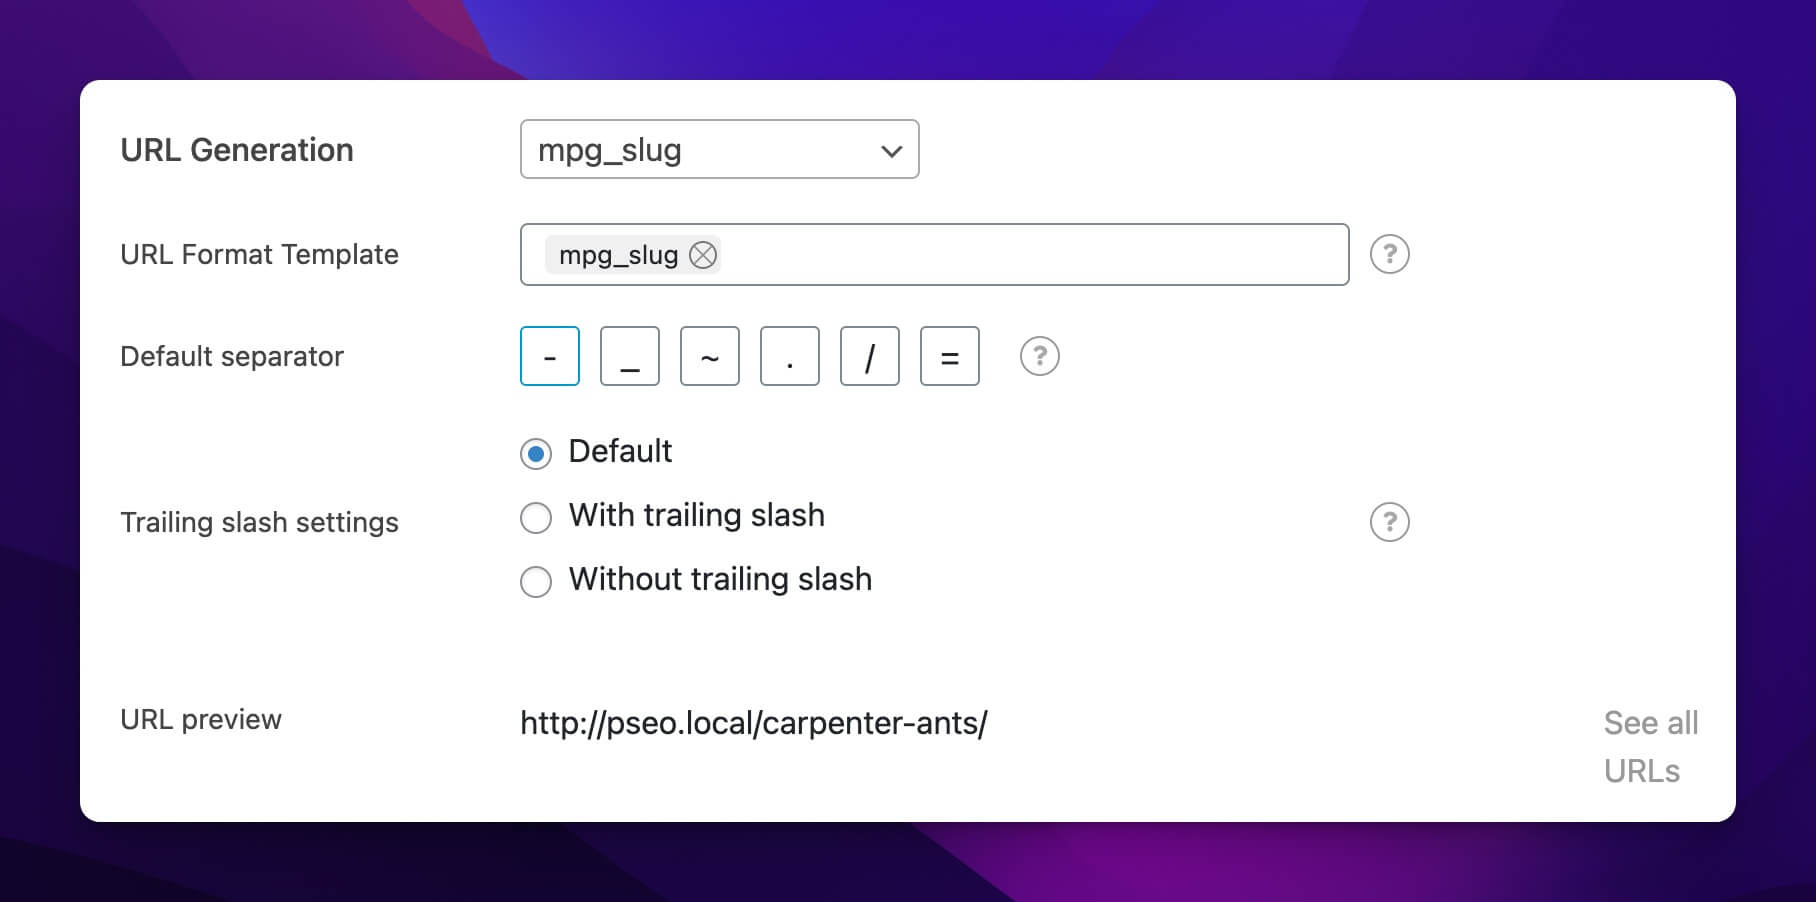
Now, set up the slug in the last section as shown below, and you’re done. If you already have a slug column in your database, you can select that, or the plugin can automatically create slugs based on the selected text.
Just click on the Save button, and you have all the pages/posts live on your website. But note that, they won’t be shown inside the regular pages/posts sections.
4. Additional options
The plugin comes with some additional features as well, let’s have a look at them:
a). Sitemap
Since the generated pages are not shown in the regular posts/pages section, it’s important to create a sitemap and submit it to the Google Search Console and other search engines.
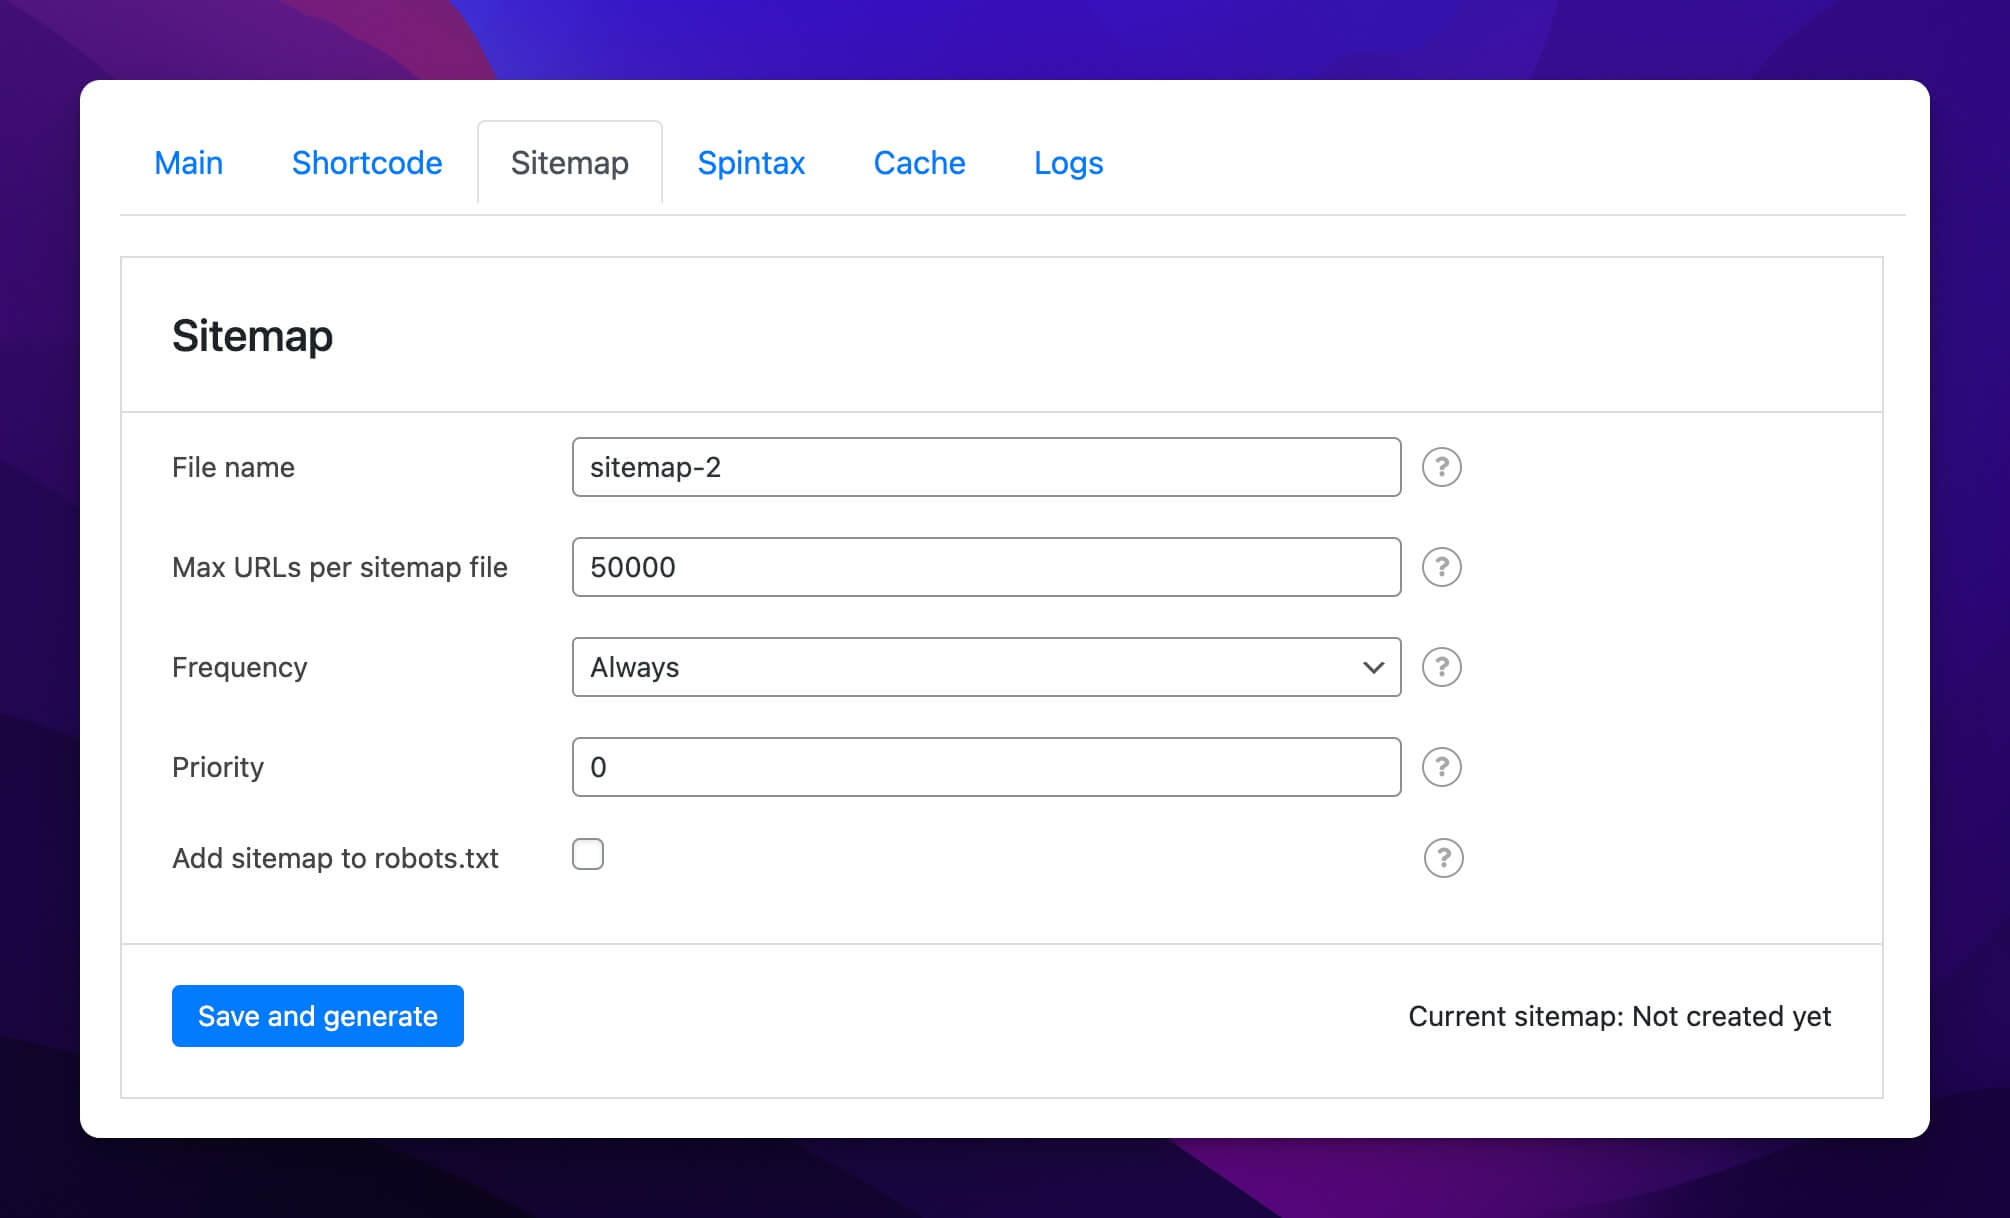
It’s straightforward to create the sitemap, as shown in the above screenshot.
b). Shortcode
The Shortcode section helps you display the generated pages on an index page. You can customise the display based on the available options.
c). Spintax
You can also use Spintax with the plugin. Just specify different versions of common words and phrases, something like the one below in the Spintax section.
{a|the|one} {quick|fast} {brown|silver} {fox|dog|wolf}I don’t use it, but it can be useful for some people.
And just like that, you have all the pages ready! For the Multi-Page Generator plugin, if you encounter any problems, you can go through their documentation here.
C. By using other 3rd party tools
Apart from WP All Import and Multi-Page Generator plugins, there are other 3rd party tools as well that you can use to do programmatic SEO in WordPress. Below, I will be mentioning some of those tools:
1. PageFactory
PageFactory is probably the simplest pSEO tool that effortlessly connects to your WordPress site via a plugin. The tool’s interface is very simple, and it’s best if you have to create simple article-style pages in bulk.
By using the tool, you need to create a page template and connect the data as a CSV file. And it creates all the pages in the background and then connects to your WordPress site as well.
PageFactory is a paid tool and costs $39/month or $299/year to use.
2. SEOBrrr
SEOBrrr is another pSEO tool for WordPress that doesn’t require any coding skills to create pages in bulk. However, the additional benefit of the tool is that you can create landing page-style templates by using different formatting options available.
Again, you can upload your own data as a CSV file and use them for creating pages.
SEOBrrr pricing starts from $19 a month and goes up to $69 a month depending on the number of pages to create and monthly pageviews.
Related: How to Do Programmatic SEO in Webflow
Final words
If you’re looking to create simple article-style pages on your WordPress site, the WP All Import plugin is the best option out there, but if you want landing page-style templates, the MPG plugin is another option.
However, if you don’t want to deal with a lot of options, you can try other 3rd party tools that I have mentioned as well. They are a lot simpler to use than these plugins but are costly as well.
If you get stuck somewhere when setting up pSEO on your WordPress site, kindly feel free to let me know in the comments below.


Leave a Reply